- Prerequisites
- Install IntelliJ on Your Computer
- Installing the IntelliJ CS 61B Plugins
- Project Setup
- Getting Java Libraries
- Importing Libraries and Running Code
- CS 61B Snaps
- Josh Hug’s Color Scheme (Optional)
Prerequisites
- Java 14 - You finished Lab 1 setup.
- You have successfully created your local repo for the class on your own
machine. This is the
fa20-s**directory you created and set up in Lab 1. - You have pulled from skeleton master, and you have a
lab2setupdirectory in the same directory as yourlab1folder. - Be mentally prepared to use a real world software development package. It will seem very complicated for a while, but we’ll lead you down the narrow path to success. Ask for help if you are stuck! It can be very hard to guess the right thing to do in IntelliJ.
Install IntelliJ on Your Computer
-
You’ll need to install the Community Edition of IntelliJ from the JetBrains website.
-
After selecting the appropriate version for your OS (Windows), click download and wait a few minutes for the file to finish downloading.
-
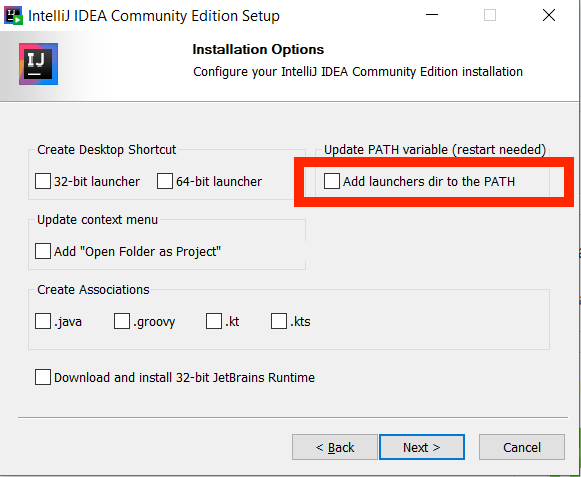
Run the installer. If you have an older version of IntelliJ, you should uninstall it at this time and replace it with this newer version. You can use all of the default installation options, with one exception, if you are on Windows, make sure you check the box “Add launchers dir to the PATH”. If you accidentally missed it, the easiest fix is to uninstall intelliJ, and running the installer again, making sure you check that box the second time around. The image below only applies to Windows.
Installing the IntelliJ CS 61B Plugins
Begin the setup process by starting up IntelliJ. Then follow the steps below.
Make sure you’re running IntelliJ Version 2020.2.1 or later before continuing. Older versions may also work but we haven’t tried them ourselves.
-
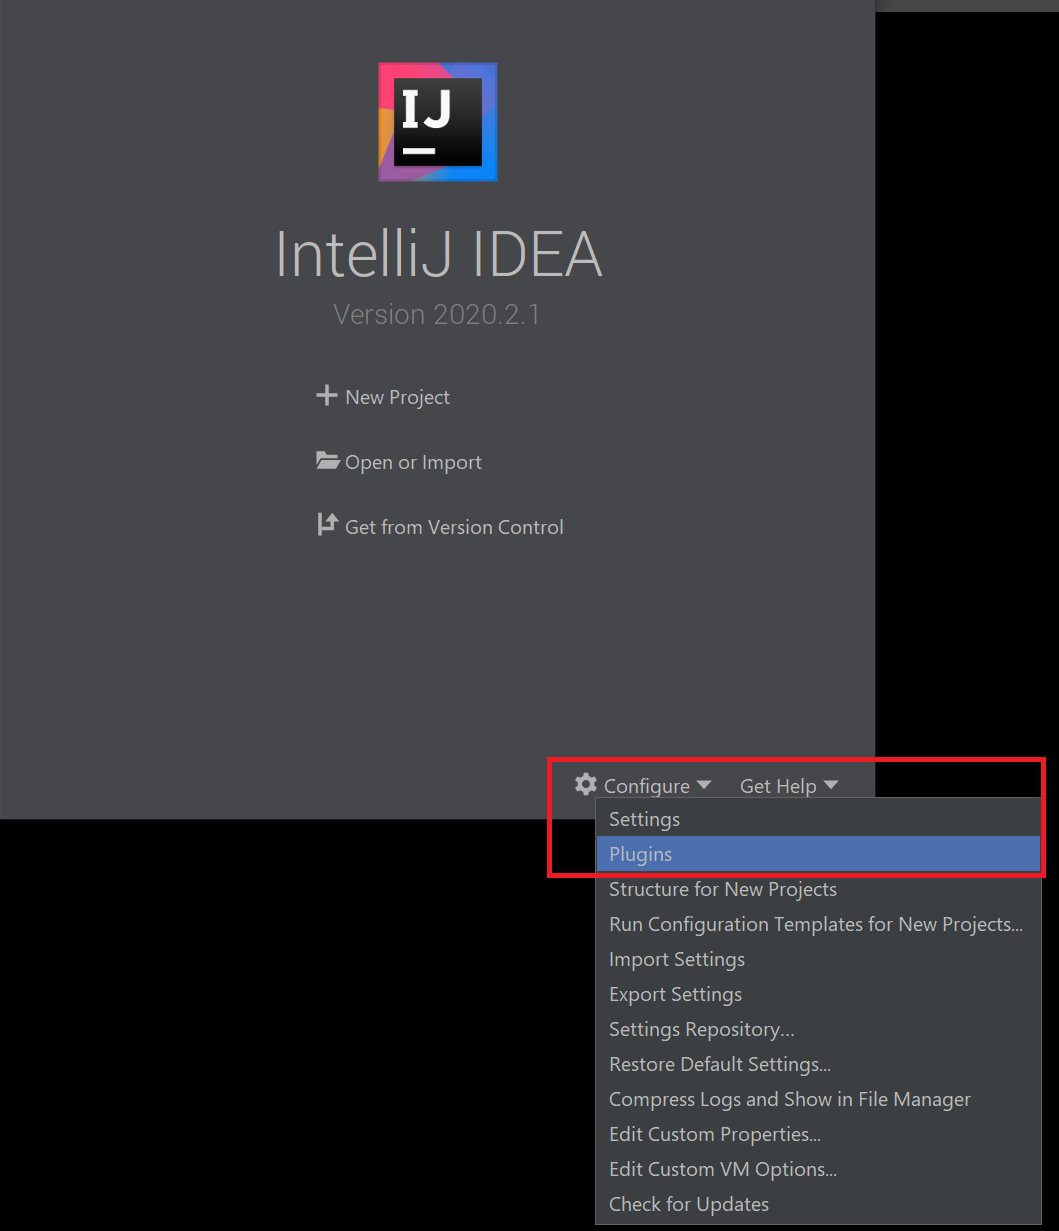
In the Welcome window, click the “Configure” → “Plugins” button on the bottom right of the window.
-
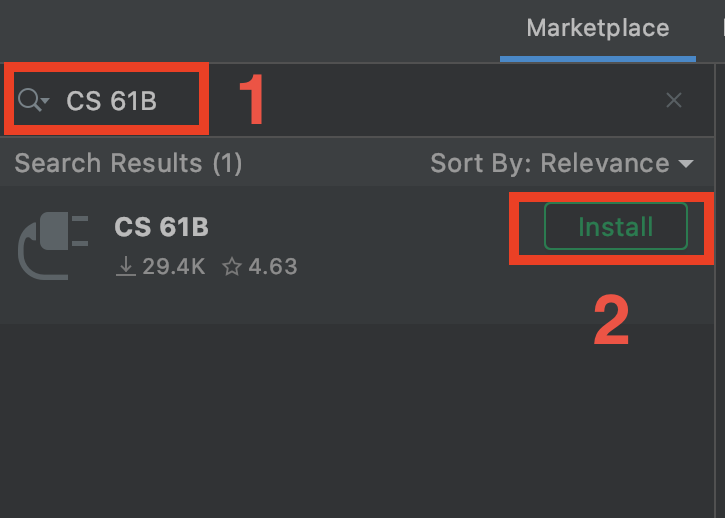
On the window that appears, click “Marketplace” and enter “CS 61B” in the search bar at the top. The CS 61B plugin entry should appear. If you click the autocomplete suggestion, a slightly different window from what is shown below may appear – this is okay.
-
Click the green Install button, and wait for the plugin to download and install.
-
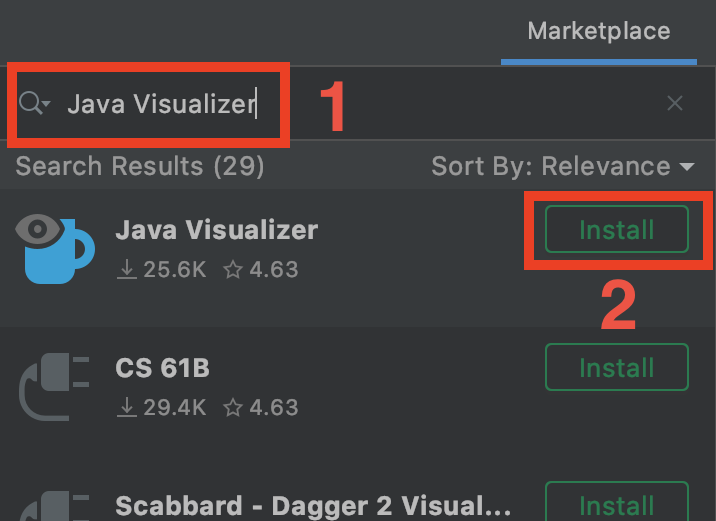
Now, search for “Java Visualizer”, and click the green Install button to install the plugin.
-
If it appears, click the green Restart IDE button to finalize the installation. If you don’t see a Restart IDE button, just continue.
For more information on using the plugins, read the plugin guide. You don’t have to read this right now.
Only move on once you have installed both plugins.
Project Setup
IntelliJ is an IDE (Integrated Development Environment). It includes a text editor as well as a whole lot of extra features to make writing code easier. Let’s try it out first on our lab1 folder.
-
Upon opening IntelliJ, click on the “open or import” option.
-
Find and choose your lab1 directory, then press the OK button. Once you’ve pressed finish, you should see something really similar to the following image. You may need to click the little triangle next to
lab1in the top left to get the source files (HelloWorld.java,HelloNumbers.javaandLeapYear.java) to show up. If you don’t see the sidebar, go to View → Tool Windows → Project, or select “Project” on the left toolbar.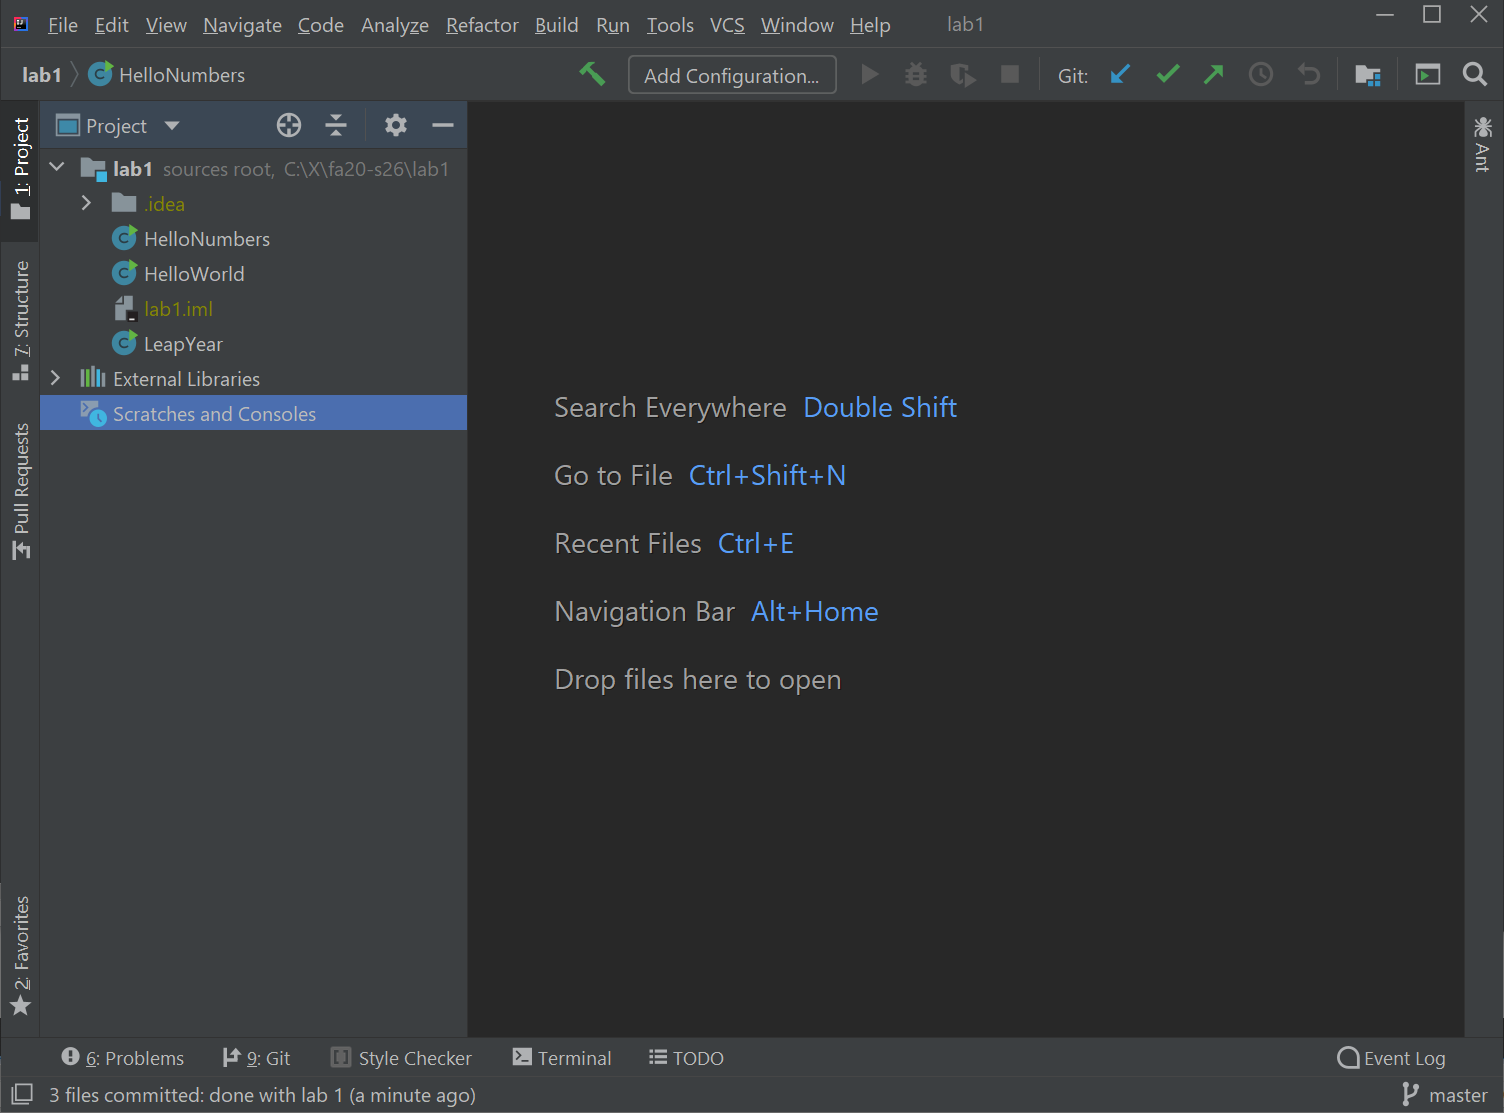
Note: The first time you start up IntelliJ it might take some time indexing files. This may take a few minutes. There should be a little progress bar in the bottom right. Some steps might not work until this is done.
-
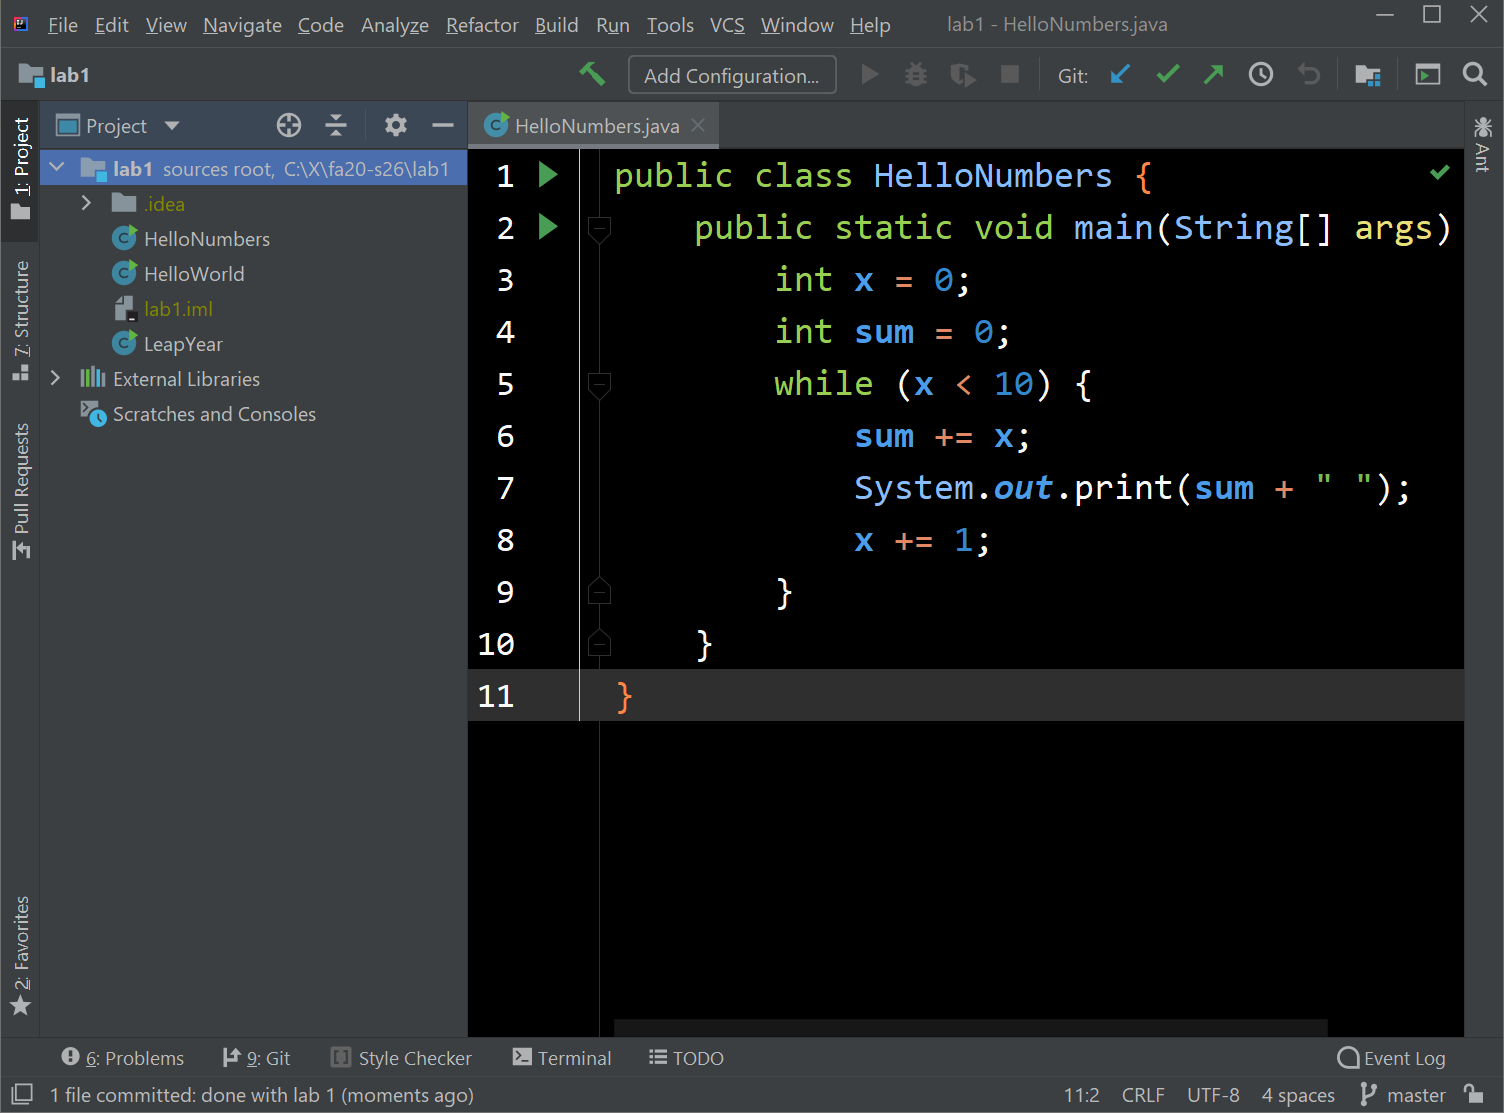
Double click on HelloNumbers and you’ll see your HelloNumbers code appear. Your color scheme won’t look like what is shown in the picture below (which is the official Josh Hug approved color scheme, called Sunburst). If you think you’d like to use Sunburst instead, see the very end of this lab for an optional setup. There should be no errors (code highlighted in red). If you see any errors, please post to Ed or ask your lab TA.
-
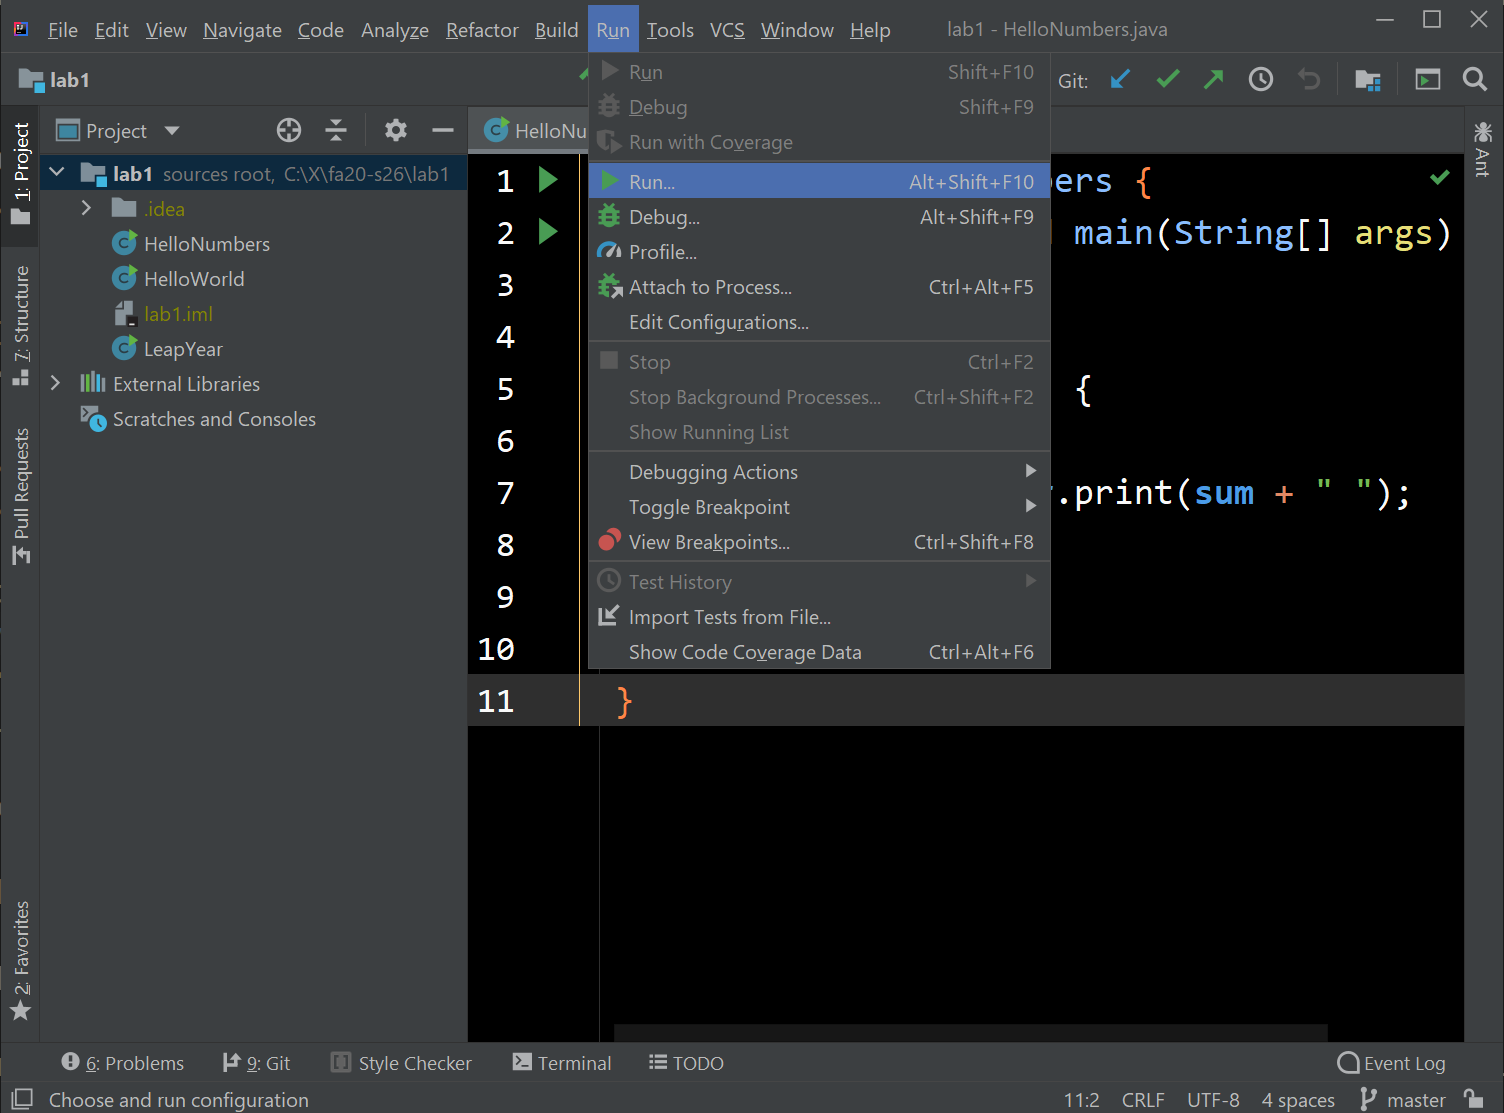
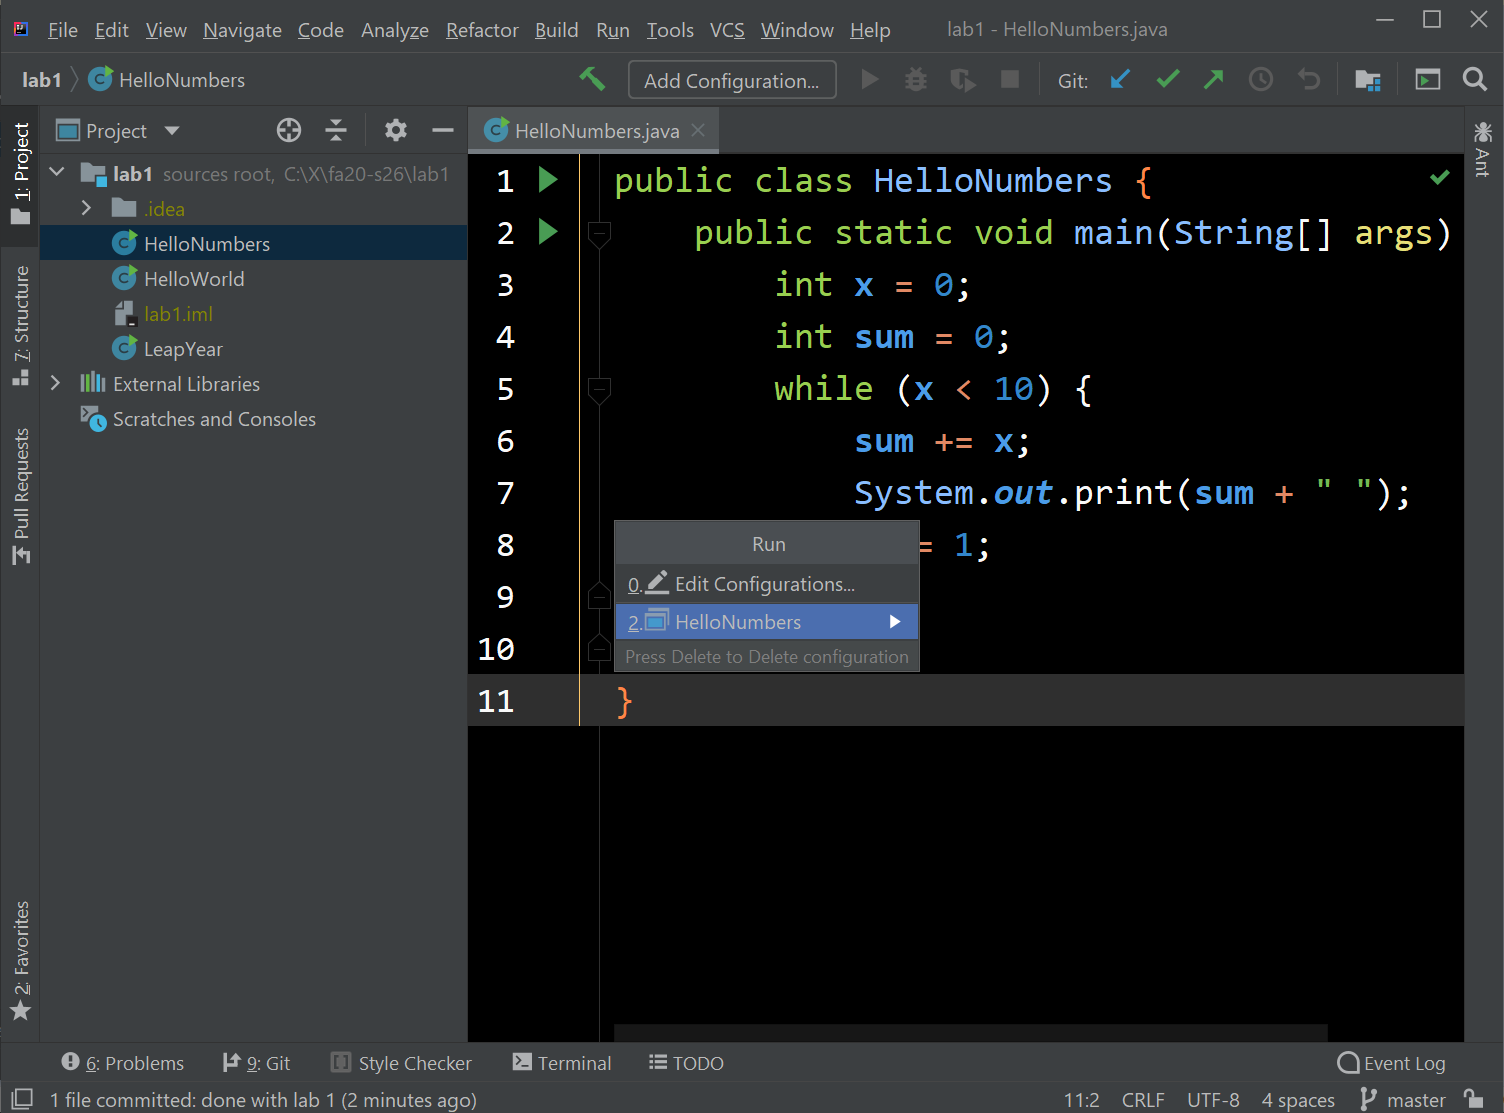
Next, let’s run your HelloNumbers. To do this, click “Run”, then click the “Run…” option.
-
This will bring up two choices, one called “Edit Configuration”, and one called “HelloNumbers”. IntelliJ supports all sorts of complicated configuration options for running Java programs, but we’re happy with the default here, so let’s just click on the one that says “HelloNumbers”.
-
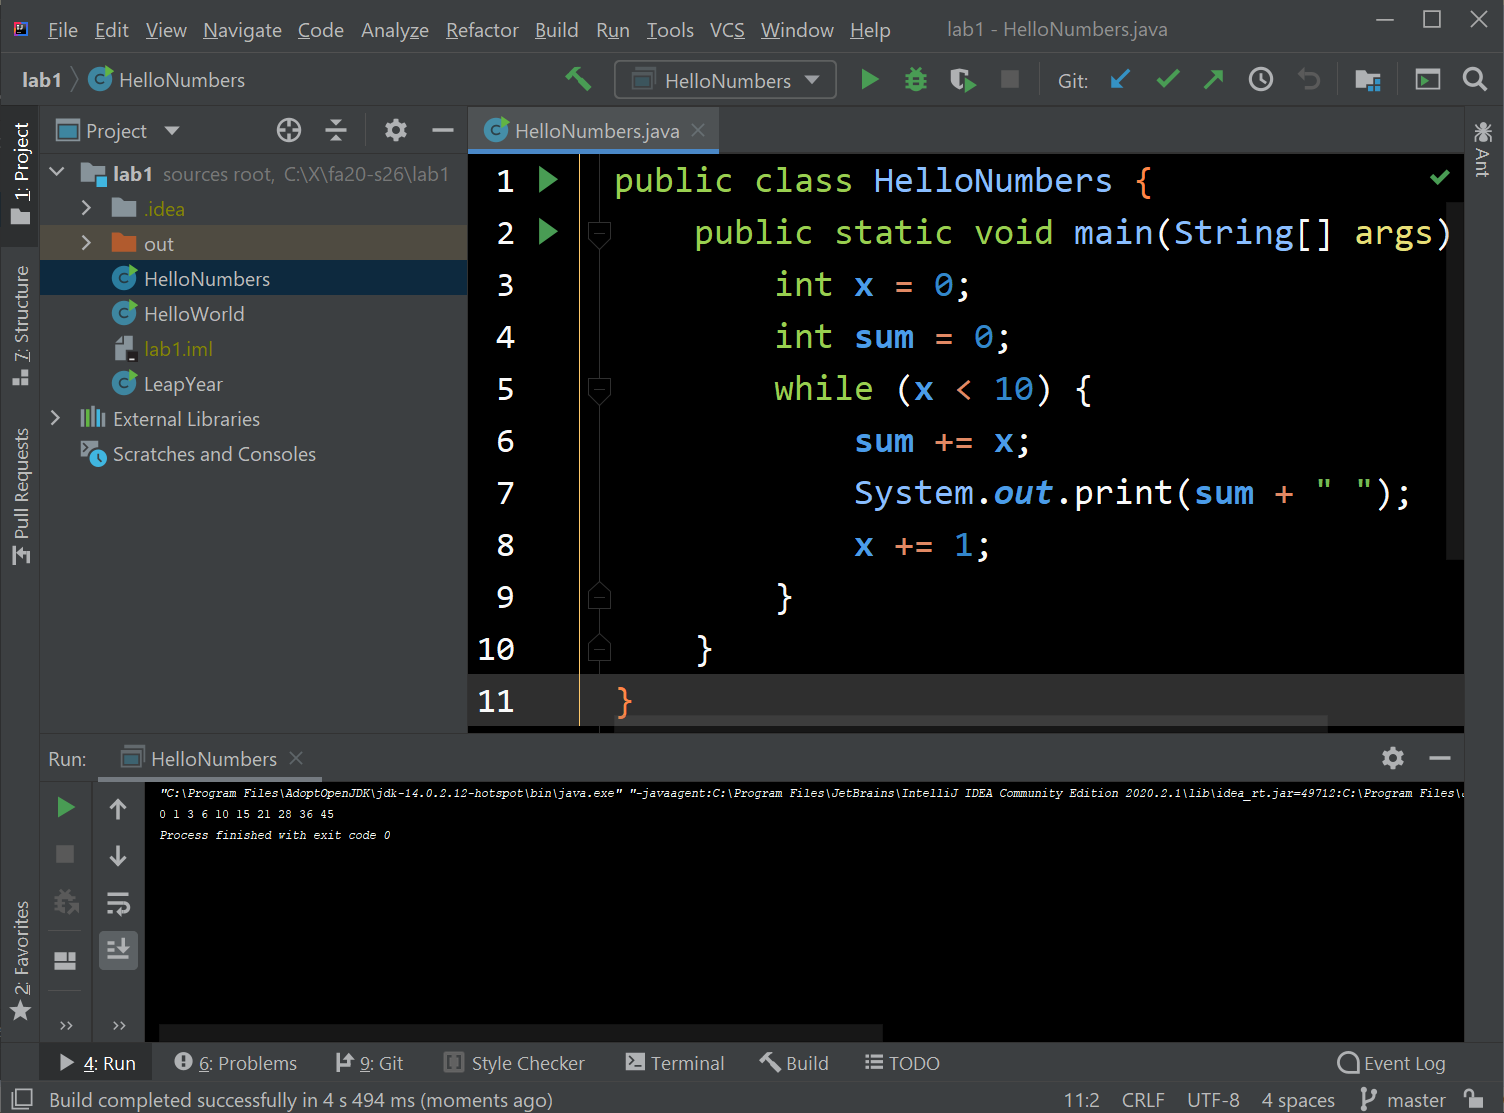
After clicking, you’ll see your code run, as shown below. Notice the output of your program is given in the little black and white window at the bottom of the screen.
-
From now on, you can also just run the green triangle button next to the class name. This is because Java has created a default run configuration for this class. Note that you’ll need to do the Run → Run… thing for any new class that you create or import.

-
Now click “File → Close Project”, and you should find yourself back at the main IntelliJ screen. This time use “Open or Import” and choose your lab2setup directory, then press the OK button. Once you’ve pressed finish, you should see something really similar to the following image. Again, you may need to click the little triangle next to
lab2setupin the top left to get the source files (Dog.javaandDogTest.java) forlab2setupto show up. If you don’t see the sidebar, go to View → Tool Windows → Project, or select “Project” on the left toolbar.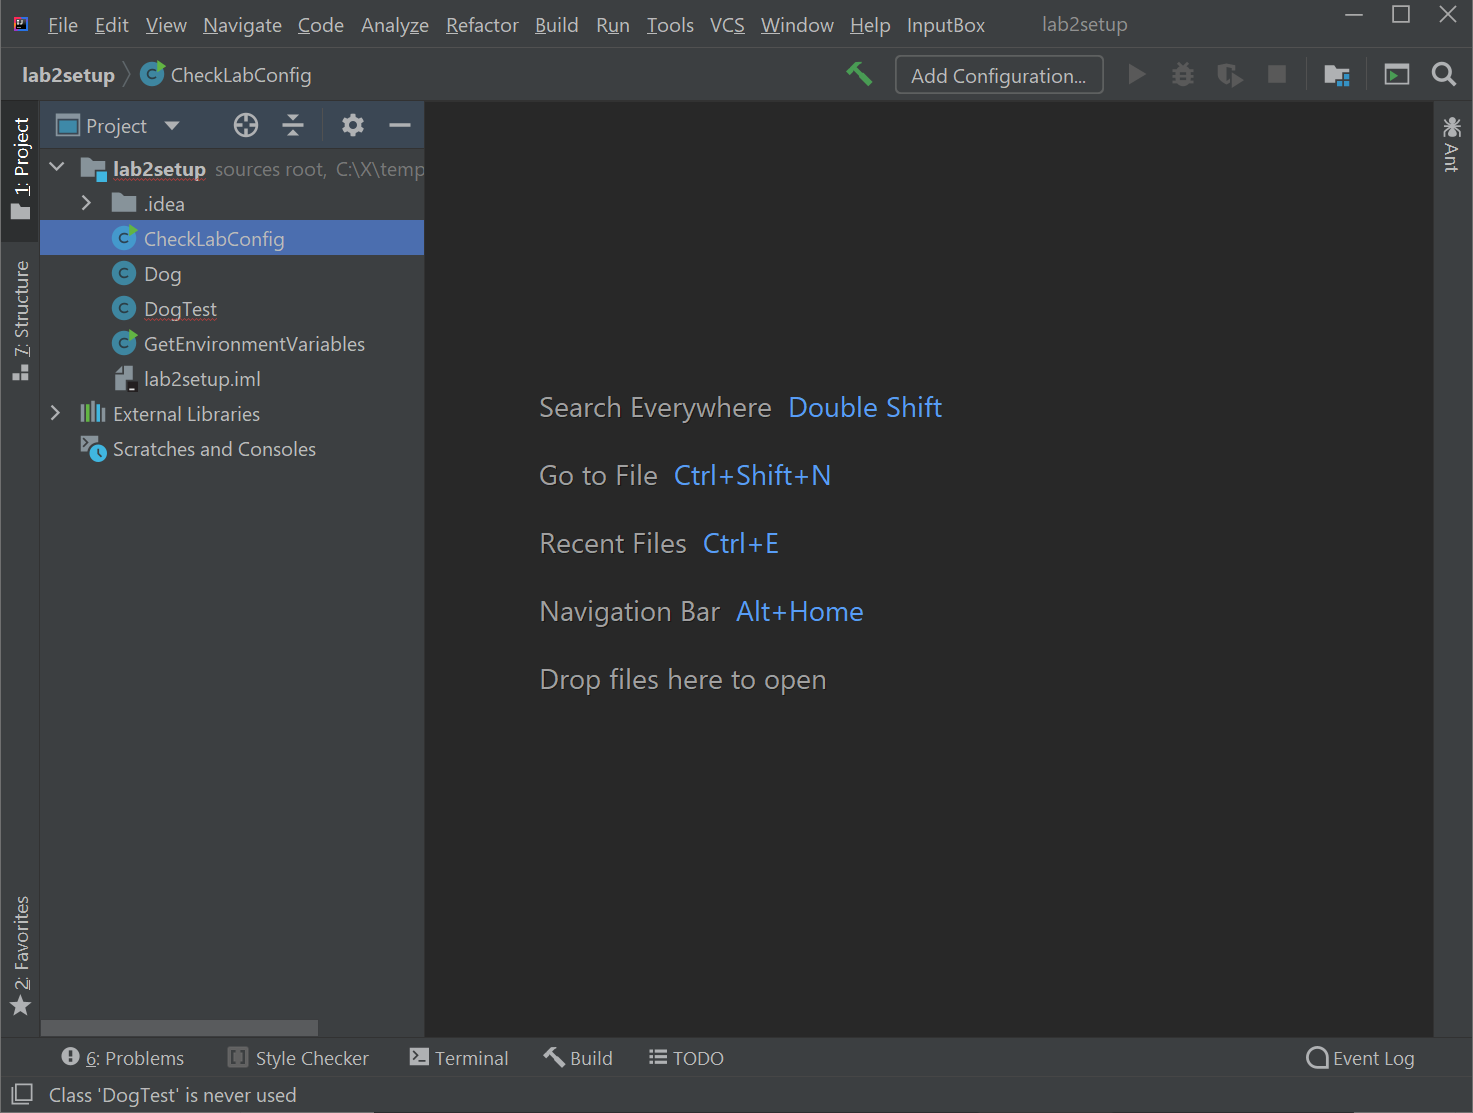
-
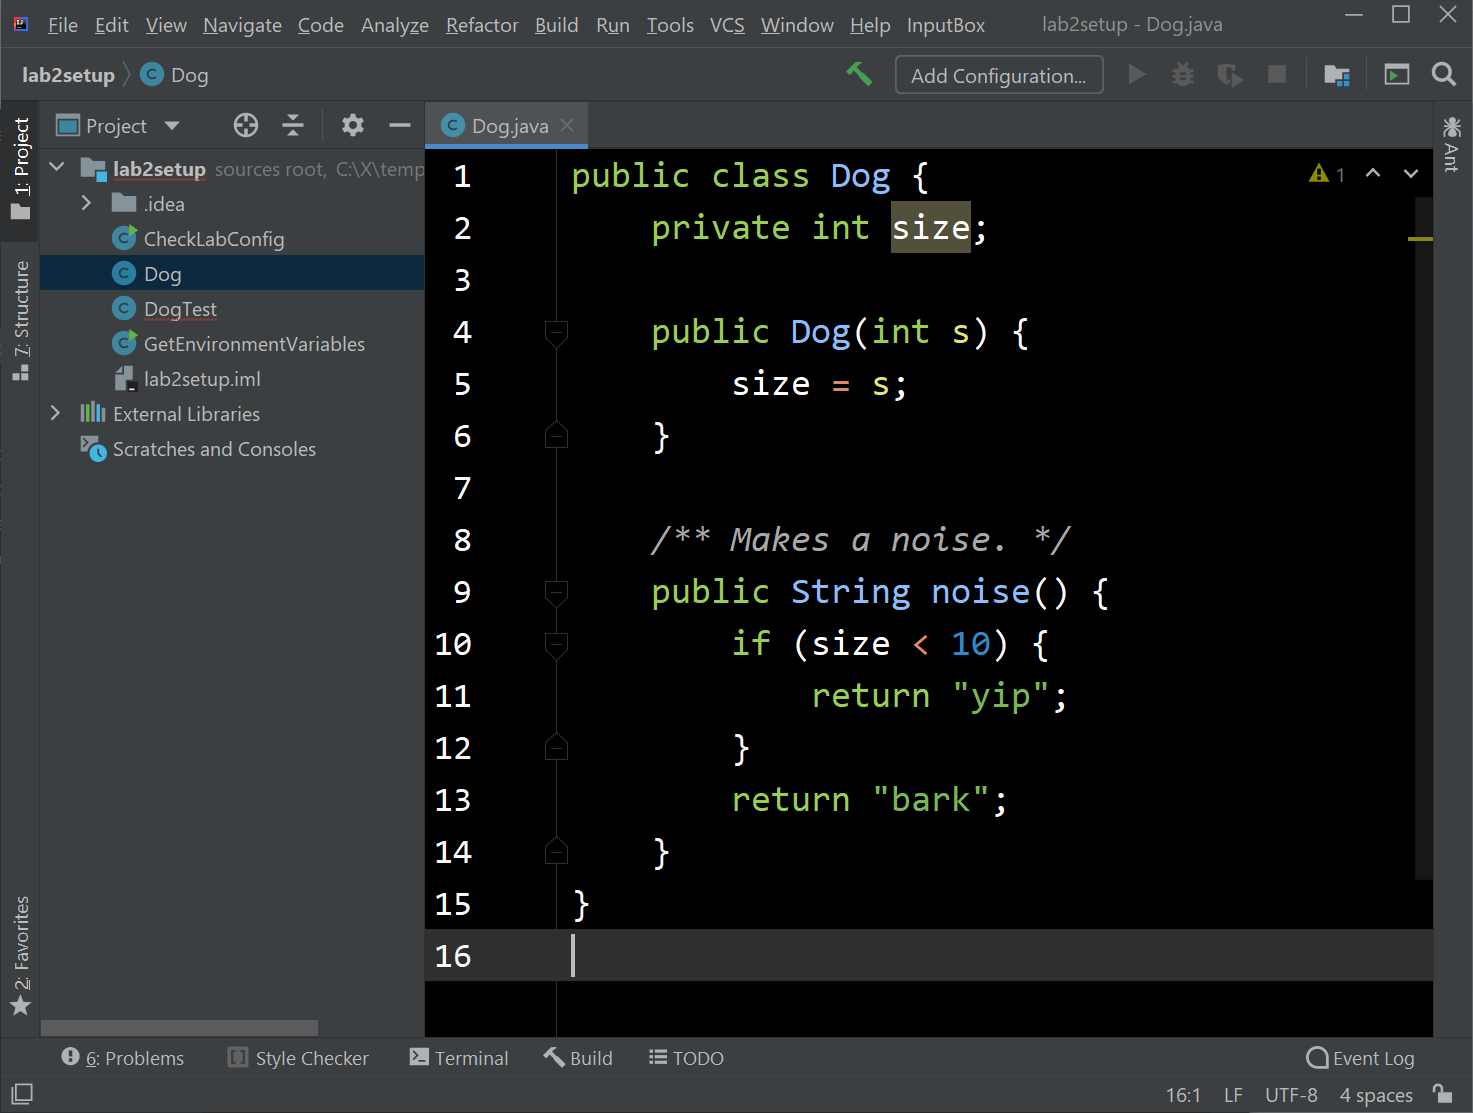
Double click on Dog.java, and you should see something like the screen below. There should be no errors (given in red). If you see any errors, please post to Ed or ask your lab TA.
-
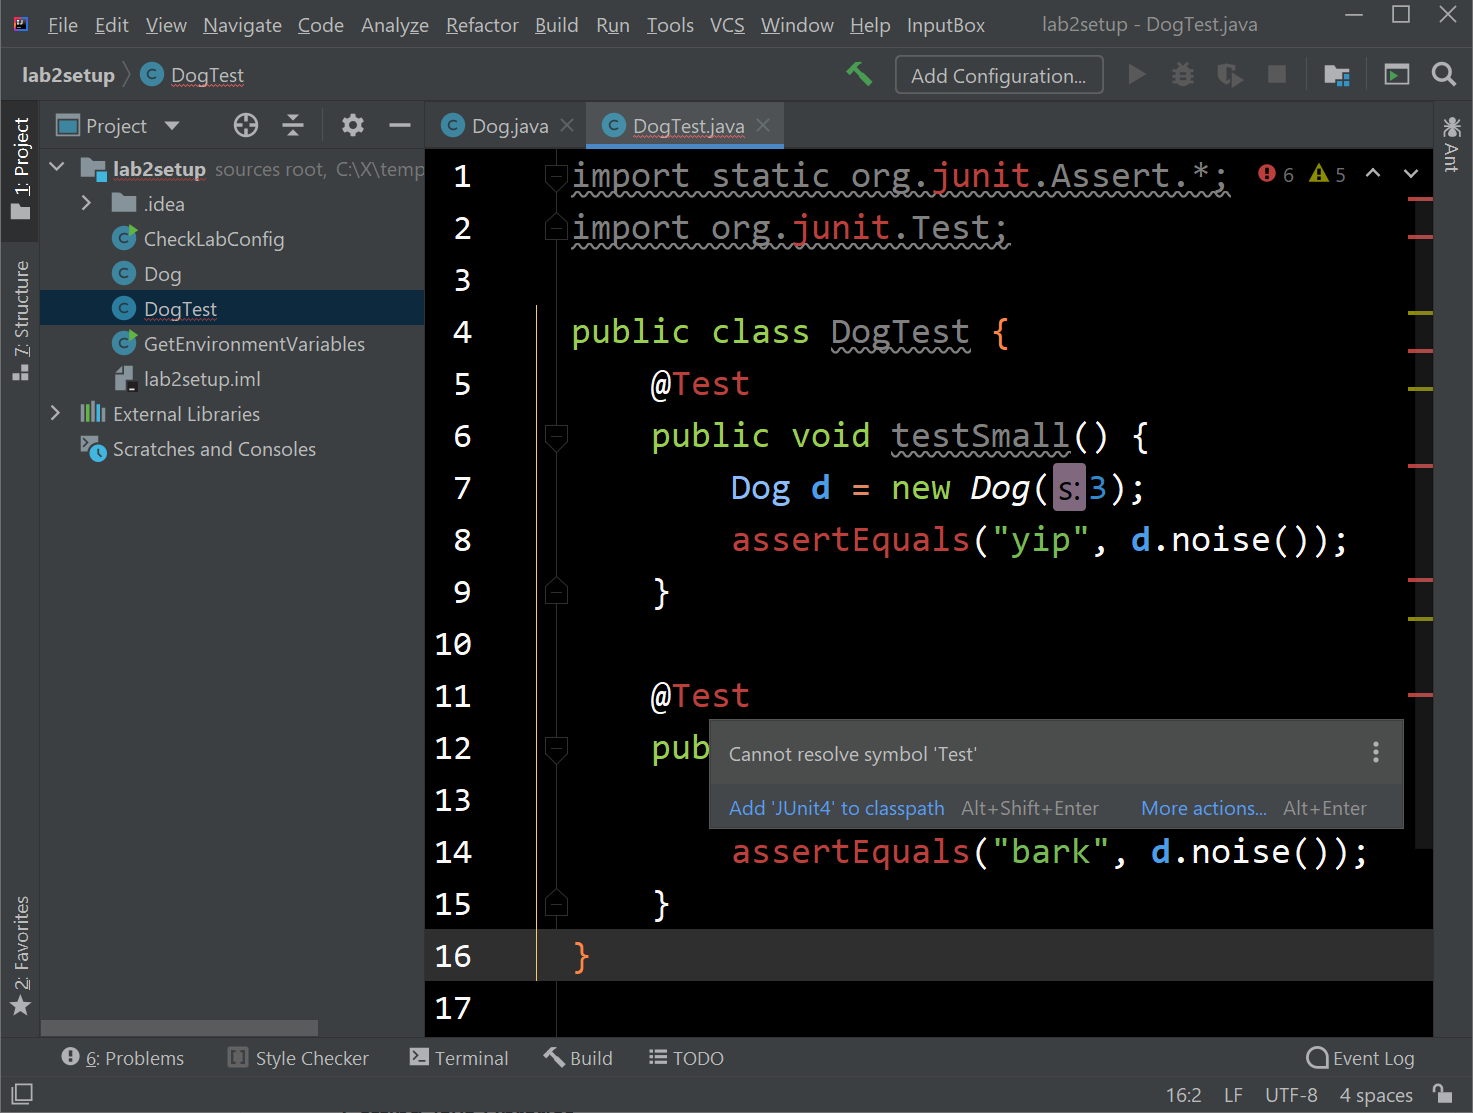
Now double click on DogTest.java, and you should see something like the screen below. Notice that there are now lots of errors, shown in red.
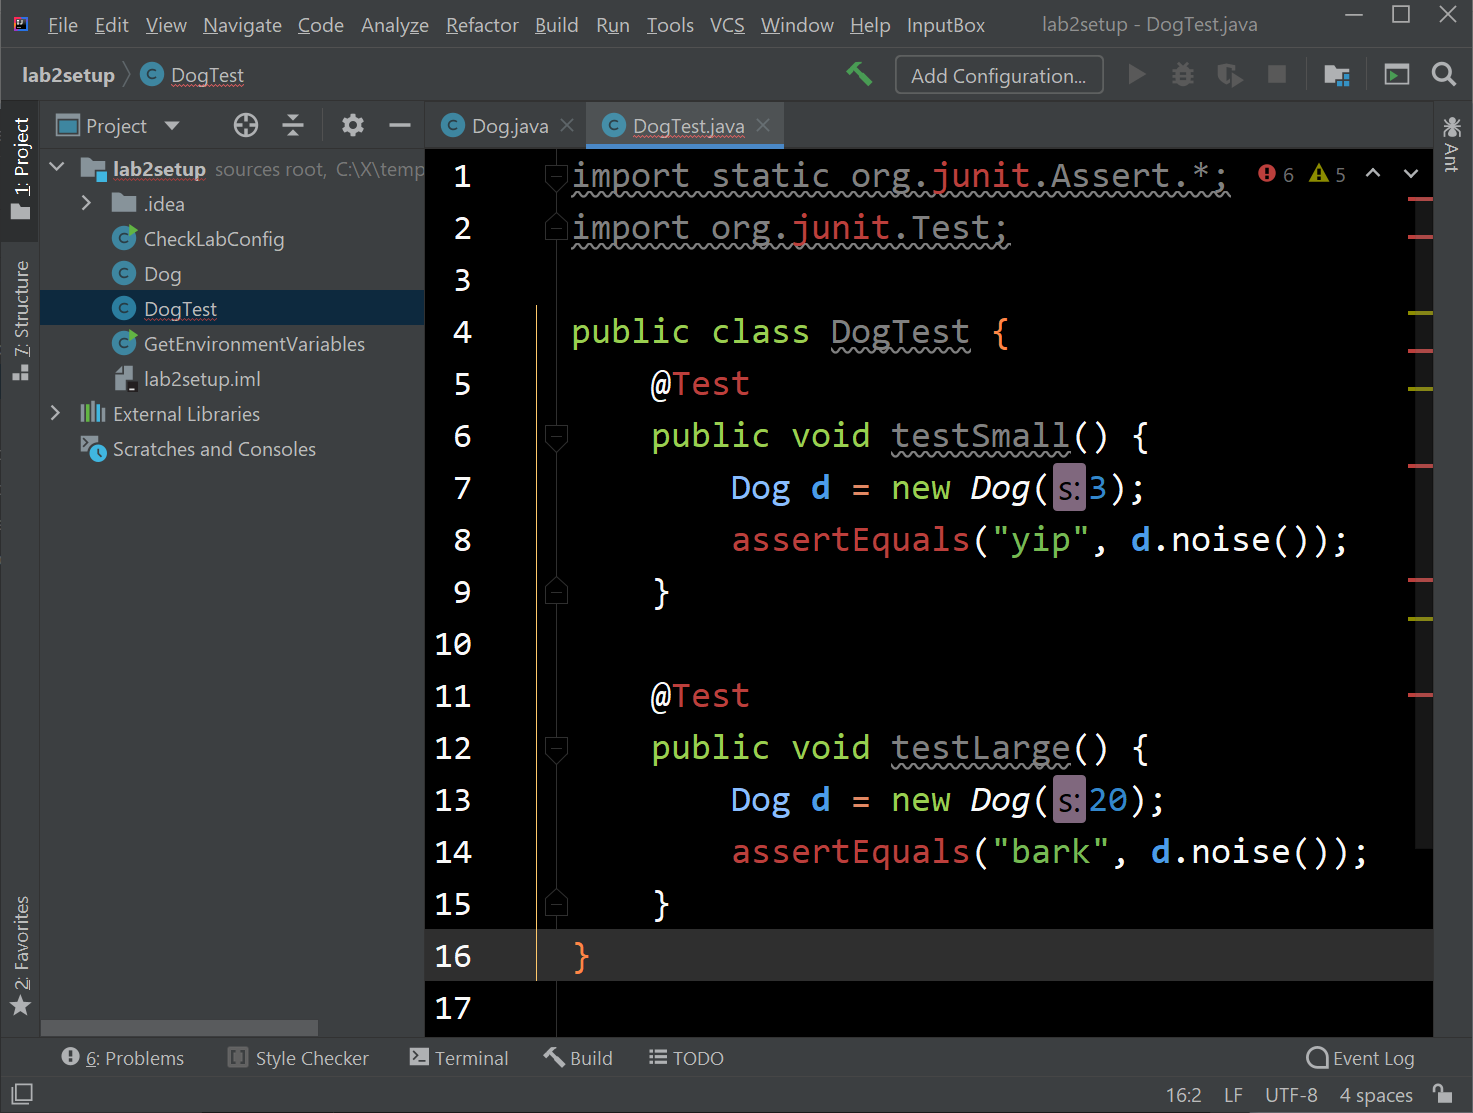
-
Hover over one of the red pieces of code. You’ll see that the problem is that Java cannot “resolve” something. This is because we haven’t downloaded the official 61B libraries. We’ll be doing this in the next section of this lab.
Getting Java Libraries
We are now going to download some Java libraries that you’ll need to complete future assignments (including this one).
- First, open up a terminal window and
cdinto yourfa20-s**repository. - Run
git submodule update --initYou should get output like this:
Submodule 'library-fa20' (https://github.com/Berkeley-CS61B/library-fa20) registered for path './' Cloning into '/Users/Connor/Downloads/fa20-s1/library-fa20'... Submodule path './': checked out '1fbc26d69f044b48346849989aeeff9761b00abf' - Ta-da! You now have libraries!
$ ls library-fa20/
data/
javalib/
Below is shown the directory structure of
library-fa20. Look inside the folder and make sure you see the seven .jar files listed below. If you’re using your operating system’s file explorer the ‘jar’ part might not show up in the filenames, and that’s OK.library-fa20/ └── javalib ├── algs4.jar ├── hamcrest-core-1.3.jar ├── jh61b.jar ├── junit-4.12.jar ├── stdlib-package.jar ├── stdlib.jar └── xchart-3.5.1.jar
Importing Libraries and Running Code
Now it’s time to get rid of the errors in DogTest.java.
Click “File” → “Project Structure” in the top left of IntelliJ. A window should
pop up, and you should click Libraries on the left panel of this window. Then click the
plus sign at the top left of the window and you should see an option pop up that says “Java”,
“From Maven”, and “Kotlin/JS” as shown below.
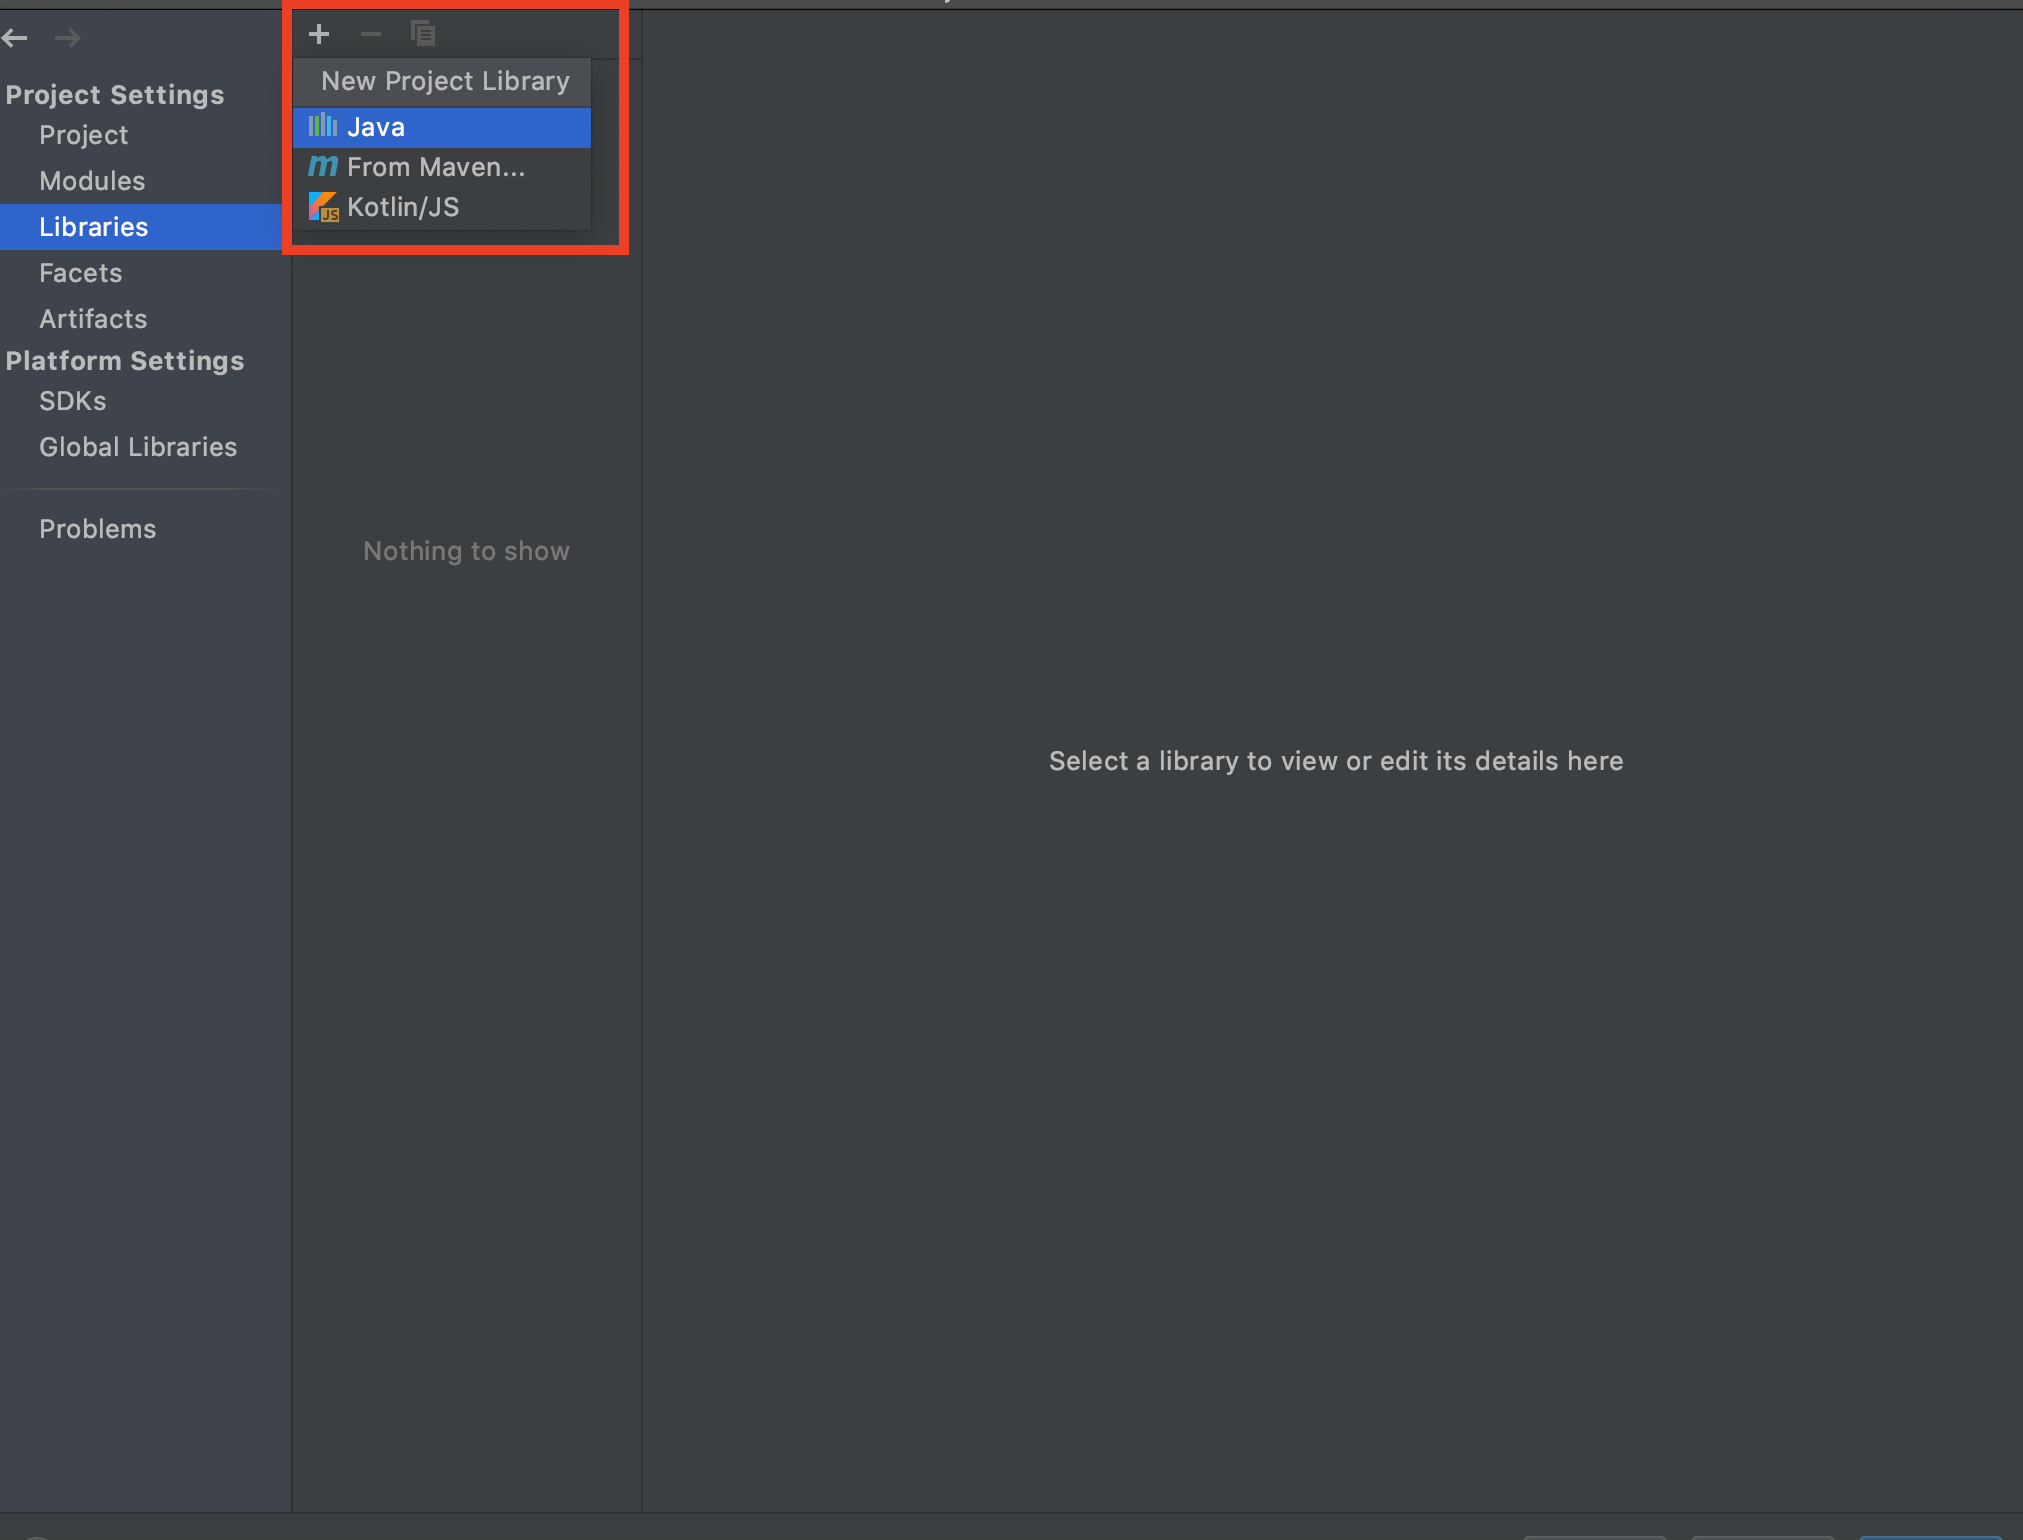
Click on the word Java, and navigate to the
javalib folder (which is in library-fa20). With the library-fa20 fold highlighted,
press OK. Then press OK at the next window again.

If you did everything correctly, you should see something similar to the screen below.
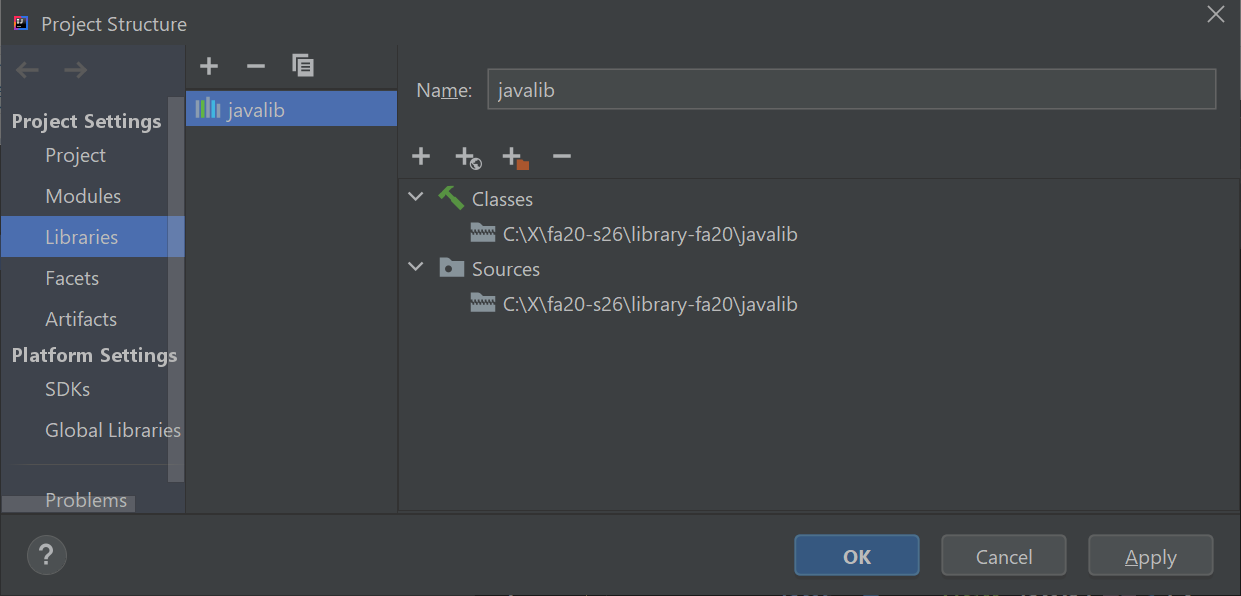
Press OK one more time, and you’ll find yourself looking at DogTest.java again. This time, the red text should be gone. Note: You’ll need to import the library-fa20 folder every time you open a new hw, lab, or project in 61B!
Try running the code by clicking “Run” → “Run…“, as shown below.
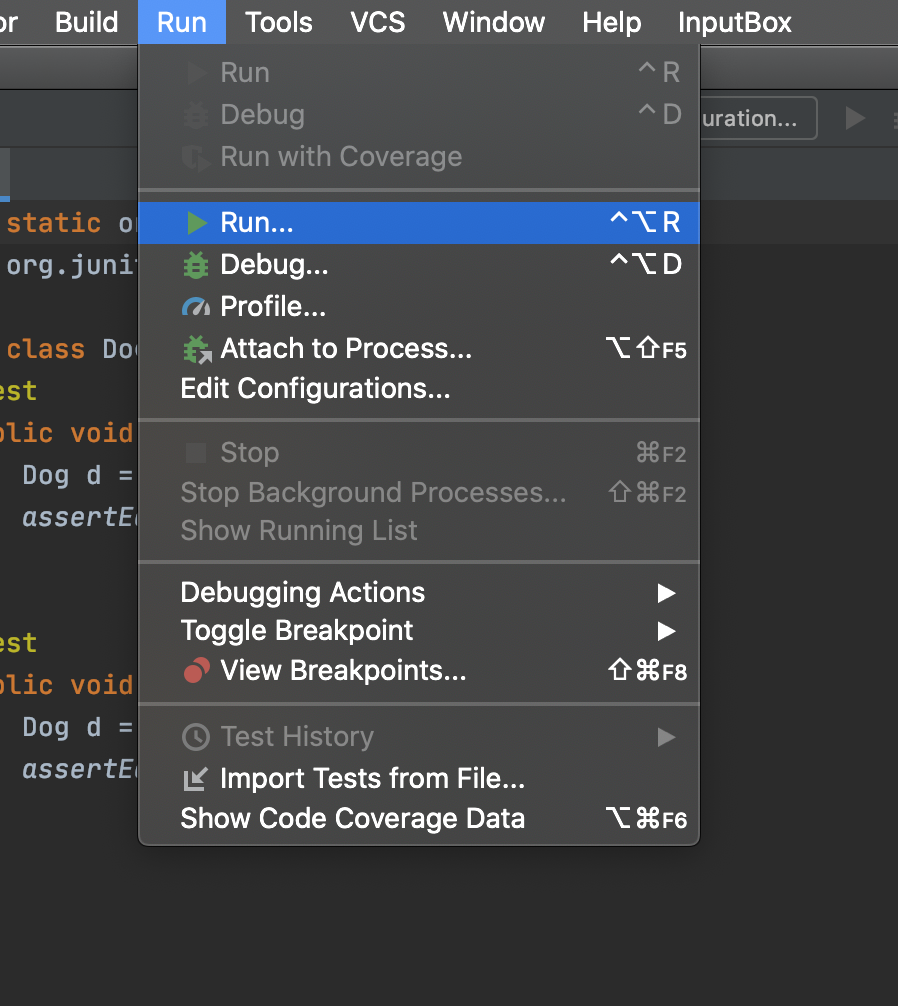
This will probably pop up a very small dialog window like the one shown. Basically IntelliJ is saying that it isn’t quite sure what you mean by running the program and is giving you three choices (yours may look slightly different).
- Option 0 is to edit the configuration before running the program (which we won’t do).
- Option 2 is to run the tests in the DogTest class.
- Option 3 is ALSO to run the tests in the DogTest class.
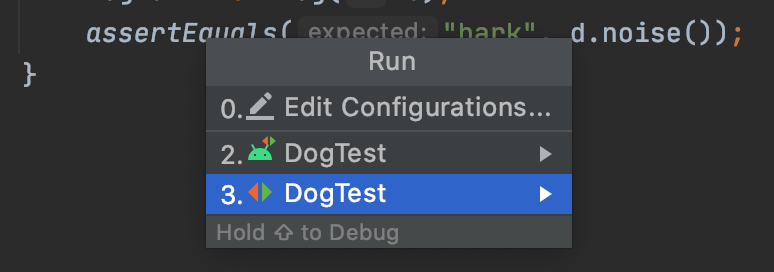
Click on either of the DogTest options and a green bar should appear with the message “Tests passed: 2 of 2 tests” as shown below.

As happened earlier with HelloNumbers, You’ll notice after running your code that the green play and green bug icons in the upper right are now green; this is because when you clicked “2.”, IntelliJ memorized what you meant by Run for this project and you can now click this button to run your program. You’ll learn more about this over time as we use more advanced features of IntelliJ.
In case you’re curious why there were two DogTest icons above, it’s because one
of them runs the tests as if it is designed for the Android operating system (the little alien)
and the other (red and green triangles) runs the test as if it is just plain old Java. For our class,
these two choices will always do the exact same thing.
CS 61B Snaps
The Snaps plugin keeps frequent snapshots of your work and saves them to a repository. This will act as a safe backup of your work. The plugin will also provide a record of how you arrived at your solution. With your explicit written permission (details later), we will later be conducting a research project to study the various paths taken by students to solve problems, and to understand how the total time spent varies with respect to demographic factors like prior programing experience.
Getting the Snaps Repo
In lab1, you should have gotten and accepted an invitation to collaborate on a snaps-fa20-s*** repo. If you have not accepted it, please do not proceed until you do. If you can’t find the invitation in your email inbox, please post on Ed or come to lab, so we can help you.
NOTE: You may have accidentally received an invite for a repo that looks like fa20-snaps-s*** (note the ‘fa20’ in the front) - you can just ignore this repo, but please make sure you have access to your snaps-fa20-s*** repo
First, we will clone the snaps repo to your computer. In your terminal (Git Bash on Windows), navigate to your home directory: cd ~. Then, run the following command, replacing *** with your repo number:
git clone https://github.com/Berkeley-CS61B-Student/snaps-fa20-s***
If you run ls, you should now see the snaps-fa20-s*** folder.
IMPORTANT: Never complete assignments in this folder. Gradescope tests will always fail if you submit code from the snaps folder. You should only interact with your fa20-s*** folder.
Setting Up Environment Variables
Next you’ll need to set up some environment variables. The precise steps to take depend on your operating system.
If you are a Mac user, verify what Mac OS version you are running. Click on the Apple logo at the top left corner of your screen. Then, click on “About This Mac”. If you are running Mac OS Catalina, choose that option below.
Once you’ve completed the steps in the appropriate instructions above, then continue on to “Test Your Environment Variables” below.
Test Your Environment Variables
After setting up the environment variables above, restart IntelliJ, and all terminal windows (close them and open a new one), so the variables can take effect.
After reopening IntelliJ, make sure the lab2setup folder is open in IntelliJ. Verify that you set the environment variables correctly by opening CheckLabConfig. Then click Run and go down to the option that says “Run…”.
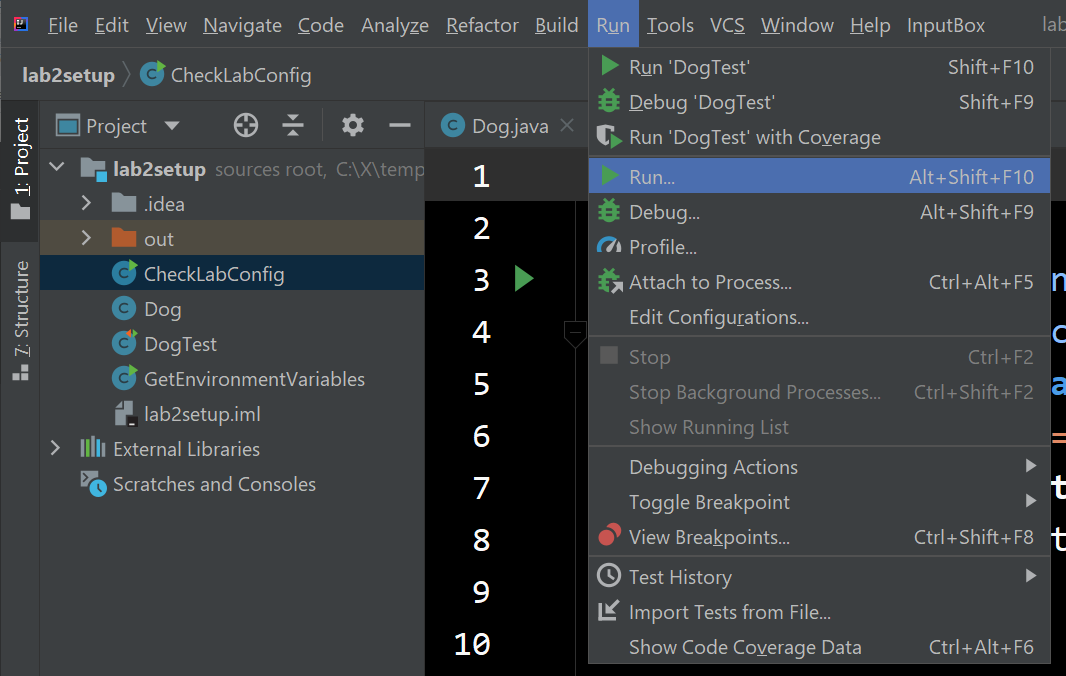
Now click on the option that contains CheckLabConfig:

This should run the main method of our CheckLabConfig class. If everything is working, you should see something like the image shown below:
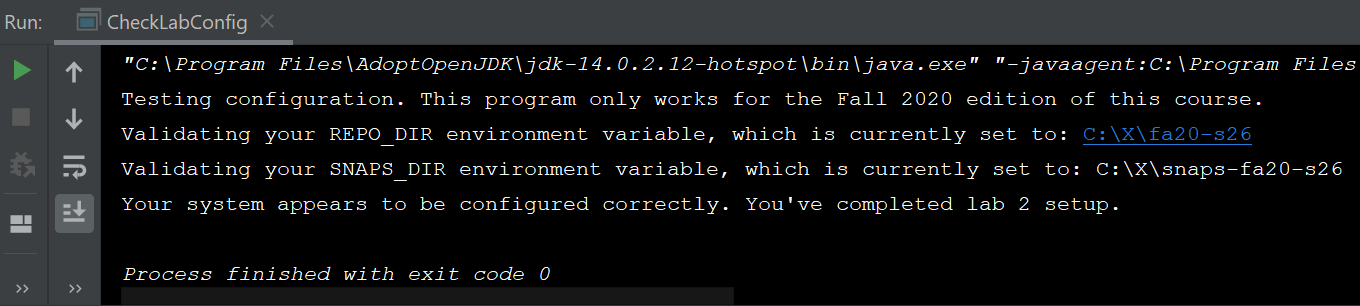
You’re now done with lab 2 setup!
Josh Hug’s Color Scheme (Optional)
I’m not a big fan of the default IntelliJ colors, so I made my own color scheme, which is a very close imitation of the extremely good Sunburst theme for Sublime. To use my theme, download hug_sunburst, and import it using the “File→Manage IDE Settings→Import Settings” option in IntelliJ. You might end up with large text, which I use for recording videos. To adjust the size of the font in Intellij to your liking, see this link.