- Introduction
- A note on Collaboration
- Overview
- Gold Points
- Grading
- Office Hours
- FAQ
Introduction
In Project 3, you will create an engine for generating explorable worlds. This is a large design project that will require you and one partner to work through every stage of development from ideation to presentation. The goal of this project is to teach you how to handle a larger piece of code with little starter code in the hopes of emulating something like a product development cycle. In accordance with this, the grading of this project will be different from other projects. Since there is no notion of “the correct answer” when it comes to world design and implementation, you will be assessed much like a performance review you might receive at an internship or job in addition to a very general autograder. While this means you will be graded slightly subjectively, we promise to be pretty nice bosses and will respect you as any boss should respect their hard working employees. Please talk to us if you feel the grading scheme feels unfair.
This project will require you a great deal of exploration and experimentation. Searching the web for answers (not solutions from past semesters) should be a regular activity throughout this process. Please know that there are no right and wrong answers, as this is a very open-ended project. However, there are some implementations and ideas that are better than others. It is ok and expected that you will go through several iterations before settling on something that you deem good. That is, this project is about software engineering.
You’re not required to use any of the fancy data structures or concepts from class (A*, MSTs, Disjoint Sets, etc). This project is about software engineering, not about data structures or algorithms. The data structures and algorithms we’ve learned about in class will make your code significantly simpler and more efficient, but please don’t use things just because we learned about them in class. Only use these tools if you feel comfortable using them in your implementation.
A video playlist (from Spring 2018) discussing tips for working on this project can be found at this link. Note that the API has changed slightly, but the basic ideas are all still true. Slides for these videos can be found at this link.
There are several key deadlines for this assignment:
- Phase 0 - Team formation: You must submit the Project 3 Partnership form by Friday, 11/06, 11:59 PM PST. You will see your partnership reflected on Beacon by Monday, 11/09.
- Phase 1 - World Generation: Due on Gradescope by 11/20 at 11:59 PM.
- Phase 2 - Interactivity: Due on Gradescope by 12/01 at 11:59 PM.
- Lab Demo: Demo projects during lab on 12/02, 12/03, or 12/04. Sign-ups for demo slots will be released later.
- Gold Points: Add creative mechanics to your world, and create a public youtube video showcasing what you built by 12/04.
You cannot submit Phase 2 of the project late (using slip days or amnesty submissions), as it will be graded during a lab checkoffs with a TA. The same goes for the Gold Points portion. While in theory you could submit Phase 1 and the supporting labs (Lab 12 and Lab 13) late, Phase 2 of the project builds upon these assignments, so it is unlikely that you will be able to submit these assignments late and still complete Phase 2 on time.
A note on Collaboration
A big part of software engineering is collaboration. There is only so much work that one person can do, and by combining your own effort and creativity with another person’s, you’ll be able to achieve so much more. That’s why we have mandatory partners for Project 3. You’ll be working with your partner on your shared repository via the version control system Git. If you’re not careful, you can run into some really nasty Git issues that arise when multiple people are pushing and pulling from the same Git repository. This is why we highly suggest you read through our partnership guides in their entirety. It’ll give you examples of best practices for collaboration and set you up so that you won’t run into many Git issues. The guide for project 3 partnerships is here and for general partnerships practices you should read this. As the partnership guide says, if you ever run into a Git issue be very careful about what you read online, and if you don’t know how to solve it, our staff is always happy to help you resolve the issue in Office Hours.
Now on to the assignment spec!
Overview
Your task for the next 2 weeks is to design and implement a 2D tile-based world exploration engine. By “tile-based”, we mean the worlds you generate will consist of a 2D grid of tiles. By “world exploration engine” we mean that your software will build a world, which the user will be able to explore by walking around and interacting with objects in that world. Your world will have an overhead perspective. As an example of a much more sophisticated system than you will build, the NES game “Zelda II” is (sometimes) a tile based world exploration engine that happens to be a video game:

The system you build can either use graphical tiles (as shown above), or it can use text based tiles, like the game shown below:
We will provide a tile renderer, a small set of starter tiles, and the headers for a few required methods that must be implemented for your world engine and that will be used by the autograder. The project will have two major deadlines. By the first deadline, you should be able to generate random worlds that meet the criteria below. By the second deadline, a user should be able to explore and interact with the world.
The major goal of this project is to give you a chance to attempt to manage the enormous complexity that comes with building a large system. Be warned: The system you build probably isn’t going to be that fun for users! Two weeks is simply not enough time, particularly for novice programmers. However, we do hope you will find it to be a fulfilling project, and the worlds you generate might even be beautiful.
Skeleton Code Structure
The skeleton code contains two key packages that you’ll be using: byow.TileEngine and byow.Core. byow.TileEngine provides some basic methods for rendering, as well as basic code structure for tiles, and contains:
TERenderer.java- contains rendering-related methods.TETile.java- the type used for representing tiles in the world.Tileset.java- a library of provided tiles.
IMPORTANT NOTE: Do NOT change TETile.java’s character field or character() method as it may lead to bad autograder results.
The other package byow.Core contains everything unrelated to tiles. We recommend that you put all of your code for this project in the byow.Core package, though this not required. The byow.Core package comes with the following classes:
RandomUtils.java- Handy utility methods for doing randomness related things.Main.java- How the user starts the entire system. Reads command line arguments and calls the appropriate function inEngine.java.Engine.java- Contains the two methods that allow interacting with your system.
byow.Core.Engine provides two methods for interacting with your system. The first is public TETile[][] interactWithInputString(String input). This method takes as input a series of keyboard inputs, and returns a 2D TETile array representing the state of the universe after processing all the key presses provided in input (described below). The second is public void interactWithKeyboard(). This method takes input from the keyboard, and draws the result of each keypress to the screen.
This project makes heavy use of StdDraw. You will likely need to consult the API specification for StdDraw at some points in the project, which can be found here.
Your project should only use standard java libraries (imported from java.*) or any libraries we provided with your repo. This is only relevant to the autograder so if you’d like to other libraries for gold points and for the video, feel free to do so.
IMPORTANT NOTE: Do NOT use static variables unless they have the final keyword! In 2018, many students ran into major debugging issues by trying to use static variables. Static non-final variables add a huge amount of complexity to a system.
Phase 1: World Generation
As mentioned above, the first goal of the project will be to write a world generator. The requirements for your world are listed below:
- The world must be a 2D grid, drawn using our tile engine. The tile engine is described in lab12.
- The world must be pseudorandomly generated. Pseudorandomness is discussed in lab 12.
- The generated world must include distinct rooms and hallways, though it may also include outdoor spaces.
- At least some rooms should be rectangular, though you may support other shapes as well.
- Your world generator must be capable of generating hallways that include turns (or equivalently, straight hallways that intersect).
- The world should contain a random number of rooms and hallways.
- The locations of the rooms and hallways should be random.
- The width and height of rooms should be random.
- The length of hallways should be random.
- Rooms and hallways must have walls that are visually distinct from floors. Walls and floors should be visually distinct from unused spaces.
- Rooms and hallways should be connected, i.e. there should not be gaps in the floor between adjacent rooms or hallways.
- The world should be substantially different each time, i.e. you should not have the same basic layout with easily predictable features
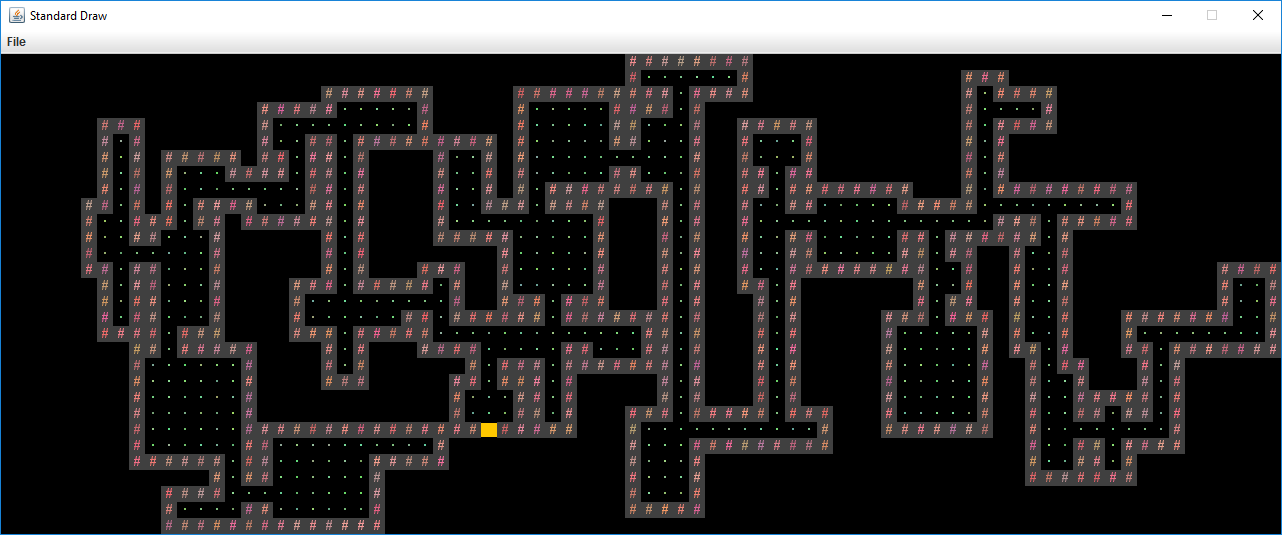
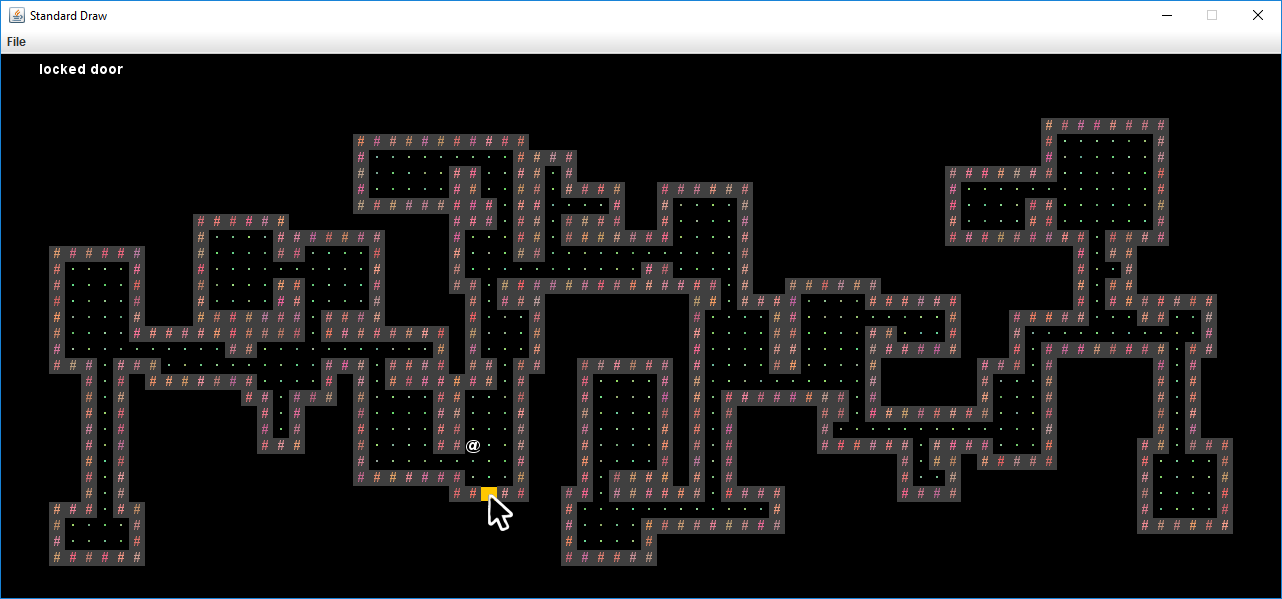
As an example of a world that meets all of these requirements (click for higher resolution), see the image below. In this image, # represents a wall tile, a dot represents a floor tile, and there is also one golden colored wall segment that represents a locked door. All unused spaces are left blank.
Once you’ve completed lab 12, you can start working on your world generation algorithm.
It is very likely that you will end up throwing away your first world generation algorithm. This is normal! In real world systems, it is common to build several completely new versions before getting something you’re happy with. The room generation algorithm above was my 3rd one, and was ultimately much simpler than either of my first two.
You’re welcome to search the web for cool world generation algorithms. You should not copy and paste code from existing games or graphical demos online, but you’re welcome to draw inspiration from code on the web. Make sure to cite your sources using @source tags. You can also try playing existing 2D tile based games for inspiration. Brogue is an example of a particularly elegant, beautiful game. Dwarf Fortress is an example of an incredibly byzantine, absurdly complex world generation engine.
The Default Tileset and Tile Rendering Engine
The tile rendering engine we provide takes in a 2D array of TETile objects and draws it to the screen. Let’s call this TETile[][] world for now. world[0][0] corresponds to the bottom left tile of the world. The first coordinate is the x coordinate, e.g. world[9][0] refers to the tile 9 spaces over to the right from the bottom left tile. The second coordinate is the y coordinate, and the value increases as we move upwards, e.g. world[0][5] is 5 tiles up from the bottom left tile. All values should be non-null, i.e. make sure to fill them all in before calling renderFrame. Make sure you understand the orientation of the world grid! If you’re unsure, write short sample programs that draw to the grid to deepen your understanding. If you mix up x vs. y or up vs. down, you’re going to have an incredibly confusing time debugging.
We have provided a small set of default tiles in Tileset.java and these should serve as a good example of how to create TETile objects. We strongly recommend adding your own tiles as well.
The tile engine also supports graphical tiles! To use graphical tiles, simply provide the filename of the tile as the fifth argument to the TETile constructor. Images must be 16 x 16, and should ideally be in PNG format. There is a large number of open source tilesets available online for tile based games. Feel free to use these.
Note: Your Github accounts are set up to reject files other than .txt or .java files. We will not have access to your tiles when running your code. Make sure to keep your own copy of your project somewhere else other than Github if you want to keep a copy of your project with graphics for archival purposes. Graphical tiles are not required.
Any TETile object you create should be given a unique character that other tiles do not use. Even if you are using your own images for rendering the tile, each TETile should still have its own character representation.
If you do not supply a filename, or the file cannot be opened, then the tile engine will use the unicode character provided instead. This means that if someone else does not have the image file locally in the same location you specified, your world will still be displayed, but using unicode characters instead of textures you chose.
The tile rendering engine relies on StdDraw. We recommend against using StdDraw commands like setXScale or setYScale unless you really know what you’re doing, as you may considerably alter or damage the a e s t h e t i c of the system otherwise.
Starting Your Program
Your program will be started by running the main method of the Main class. You will see that this method calls one of two possible methods, based on the way a user wants to interact with your program. Users can provide the program a command line argument, describing how they want to generate the random world and what exploration they wish to complete, in which case, Main.main calls the Core.Engine.interactWithInputSting(String s) method. If no command line argument
was provided, the user wants to interact with the program using a GUI menu and exploring the world using the keyboard, in which case Main.main calls the Core.Engine.interactWithKeyboard() method.
For phase 1, your project does not need to support interactWithKeyboard() but it must support interactWithInputString(). Specifically, you should be able to handle an input of the format "N#######S" where each # is a digit and there can be an arbitrary number of #s. This corresponds to requesting a new world (N), providing a seed (#s), and then pressing S to indicate that the seed has been completely entered.
We recommend that you do not implement Core.Engine.interactWithKeyboard() until you get to phase 2 of the project (interactivity), though you’re welcome to do so at anytime. It will be easier to test drive and debug your world generator by using interactWithInputString instead.
We also recommend not using Core.Main.main until you get to phase 2. It’s easier to do phase 1 by writing your own main method in the class you interact with the most, that creates a renderer, calls interactWithInputString, then draws the result. You can provide a main method command line argument in the same way you did when you completed Project 0!
Finally, we recommend that you make minimal modifications to the Main class. It is a much better idea to delegate all the work of the program to other classes you will create.
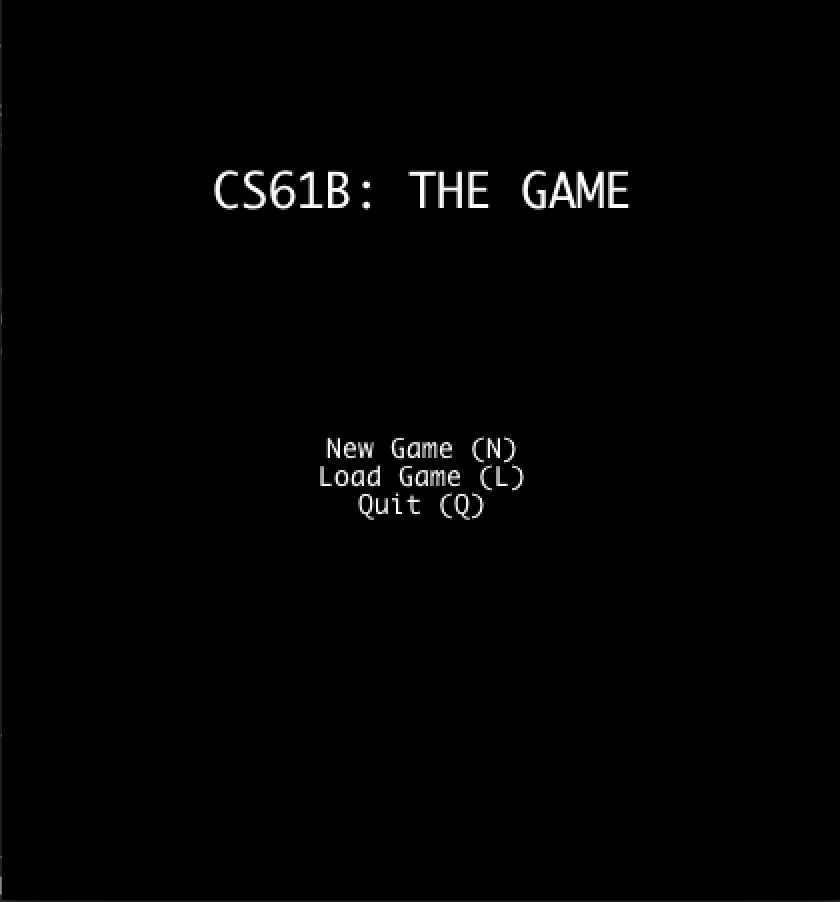
When your Core.Engine.interactWithKeyboard() method is run, your program must display a Main Menu that provides at LEAST the options to start a new world, load a previously saved world, and quit. The Main Menu should be fully navigable via the keyboard, using N for “new world”, L for “load world”, and Q for quit. You may include additional options or methods of navigation if you so choose.
After pressing N on the keyboard for “new world”, the user should be prompted to enter a “random seed”, which is an integer of their choosing. This integer will be used to generate the world randomly (as described later and in lab 12). After the user has pressed the final number in their seed, they should press S to tell the system that they’ve entered the entire seed that they want. Your world generator should be able to handle any positive seed up to 9,223,372,036,854,775,807. There is no defined behavior for seeds larger than this.
The behavior of the “Load” command is described later in this specification.
If the system is instead started with Core.Engine.interactWithInputString(), no menu should be displayed and nothing should be drawn to the screen. The system should otherwise process the given String as if a human user was pressing the given keys using the Core.Engine.interactWithKeyboard() method. For example, if we call Core.Engine.interactWithInputString("N3412S"), your program should generate a world with seed 3412 and return the generated 2D tile array. Note that letters in the input string can be upper or lower case and your engine should be able to accept either keypress (ie. “N” and “n” should both initiate the process of world generation). You should NOT render any tiles or play any sound when using interactWithInputString().
If you want to allow the user to have additional options, e.g. the ability to pick attributes of their character, specify world generation parameters, etc., you should create additional options. For example, you might add a fourth option “S” to the main menu for “select creature and create new world” if you want the user to be able to pick what sort of creature to play as. These additional options may have arbitrary behavior of your choosing, however, the behavior of N, L, and Q must be exactly as described in the spec!
Phase 1 Summary
For Phase 1, you should be able to run Main.main by providing an input String, and have your program draw a world, that adhere to the requirements mentioned above.
Worlds should be visibly different for different seeds provided to the program. To get help in Office Hours and Gitbugs you should also have an up-to-date design document (described in the next section).
Design Document
Since we did not provide you with any significant skeleton code for Project 3, and since the project is very open ended, we expect that BYOW implementations will vary a fair amount between students. In order for the course staff to provide you with support for this project, we request that you have a design document that reflects the current state of your project. We will not be able to process your Gitbugs, if you do not provide us with an up-to-date design document. We will also not be able to provide sufficient help in office hours for questions that are specific to your implementation if you don’t have an up-to-date design document. It is not feasible for us to try to understand your design remotely otherwise. So, before you submit a Gitbug, make sure that the design document in your proj3 folder reflects the current state of your project.
Note that this is an exercise that is meant to help you, and to help us give you the best support possible.We highly encourage you to keep an up-to-date design document while working on this project. Having access to a design document in office hours for example, may save you time explaining your implementation to a TA. Design documents are important tools for software engineers. In a nutshell, these are documents that describe the structure of a program: the conceptual modules it comprises, the abstractions (classes in an object-oriented program) it uses, the implementation strategies (data structures and algorithms) each class uses, and how these modules and abstractions interact with each other.
Writing down a design for a program helps us plan out a project, organize ideas, and notice strategic design flaws before writing any code. Additionally, while working on a large-scale project like BYOW, having access to a design document may help you during the development process, as you will often need to reason about how multiple components of your program interact with each other.
Before you begin writing any code, use the guidelines listed here to create a plan for every feature of your BYOW program, and convince yourself that your design is correct. Writing a design document is an iterative process. After coming up with your initial design, you may find some flaws in it, requiring you to revisit your design and update its description according to your new findings.
Note: Your design document will NOT be graded ever. We are just likely to not be able to help you with Gitbugs and in Office Hours if you don’t have a handy design document.
Design Document Guidelines
Please use the following format for your BYOW design document. Your design document should be written in markdown, a language that allows you to nicely format and style a text file. Organize your design document in a way that will make it easy for you or a course-staff member to read. You should complete your design document in the README.md file in your proj3 folder. If you open this file in intelliJ, it will automatically render into a nicely formatted document on the right.
Design Document Sections
1. Classes and Data Structures
Include here any class definitions. For each class, list the instance variables (if any). Include a brief description of each variable and its purpose in the class. Your explanations in this section should be as concise as possible. Leave the full explanation to the following sections. You may cut this section short if you find your document is too wordy.
2. Algorithms
This is where you tell us how your code works. For each class, include a high-level description of the methods in that class. That is, do not include a line-by-line breakdown of your code, but something you would write in a javadoc comment above a method, including any edge cases you are accounting for. We have read the project spec too, so make sure you do not repeat or rephrase what is stated there. This should be a description of how your code accomplishes what is stated in the spec. This is also a place where you can describe how different classes interact with each other (via their methods).
The length of this section depends on the complexity of the task and the complexity of your design. However, simple explanations are preferred. Here are some formatting tips:
- For complex tasks, like adding rooms of random sizes at random locations, we recommend that you split your task into parts. Describe your algorithm for each part in a separate section. Start with the simplest component and build up your design, one piece at a time. Different sub-tasks may belong to different classes. If an algorithm uses a method (a subtask) from a different class be sure to mention it.
- Try to clearly mark titles or names of classes with white space or some other symbols.
3. Persistence
You should only tackle this section after you are done with phase 1. This section should describe how you are going to save the state of a world, and load it again, following the requirements in the spec. Again, try to keep your explanations clear and short. Include all the components your program interacts with - classes, specific methods, and files you may create.
Example
To illustrate all this, we’ve created a sample design document for BearMaps.
Phase 2: Interactivity
In the second phase of the project, you’ll add the ability for the user to actually interact with the world, and will also add user interface (UI) elements to your world to make it feel more immersive and informative.
The requirements for interactivity are as follows:
- The user must be able to control some sort of “avatar” that can moved around using the W, A, S, and D keys. Lab 13 covers how to include interactivity. By “avatar”, we just mean some sort of on screen representation controlled by the user. For example, in my project, I used an “@” that could be moved around.
- The avatar must be able to interact with the world in some way.
- Your system must be deterministic in that the same sequence of keypresses from the same seed must result in exactly the same behavior every time. Note that a
Randomobject is guaranteed to output the same random numbers every time. - In order to support saving and loading, your program will need to create some files in your
proj3directory (more details later in the spec and in the skeleton code). The only files you may create must have the suffix “.txt” (for example “savefile.txt”). You will get autograder issues if you do not do this.
Optionally, you may also include game mechanics that allow the user to win or lose (see gold points below). Aside from these feature requirements, there will be a few technical requirements for your system, described in more detail below.
UI (User Interface) Appearance
After the user has entered a seed and pressed S, the world should be displayed with a user interface. The user interface of your project must include:
- A 2D grid of tiles showing the current state of the world.
- A “Heads Up Display” (HUD) that provides additional information that maybe useful to the user. At the bare minimum, this should include Text that describes the tile currently under the mouse pointer.
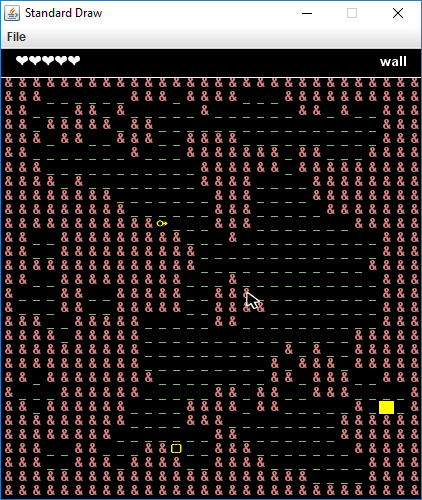
As an example of the bare minimum, the simple interface below displays a grid of tiles and a HUD that displays the description of the tile under the mouse pointer (click image for higher resolution):
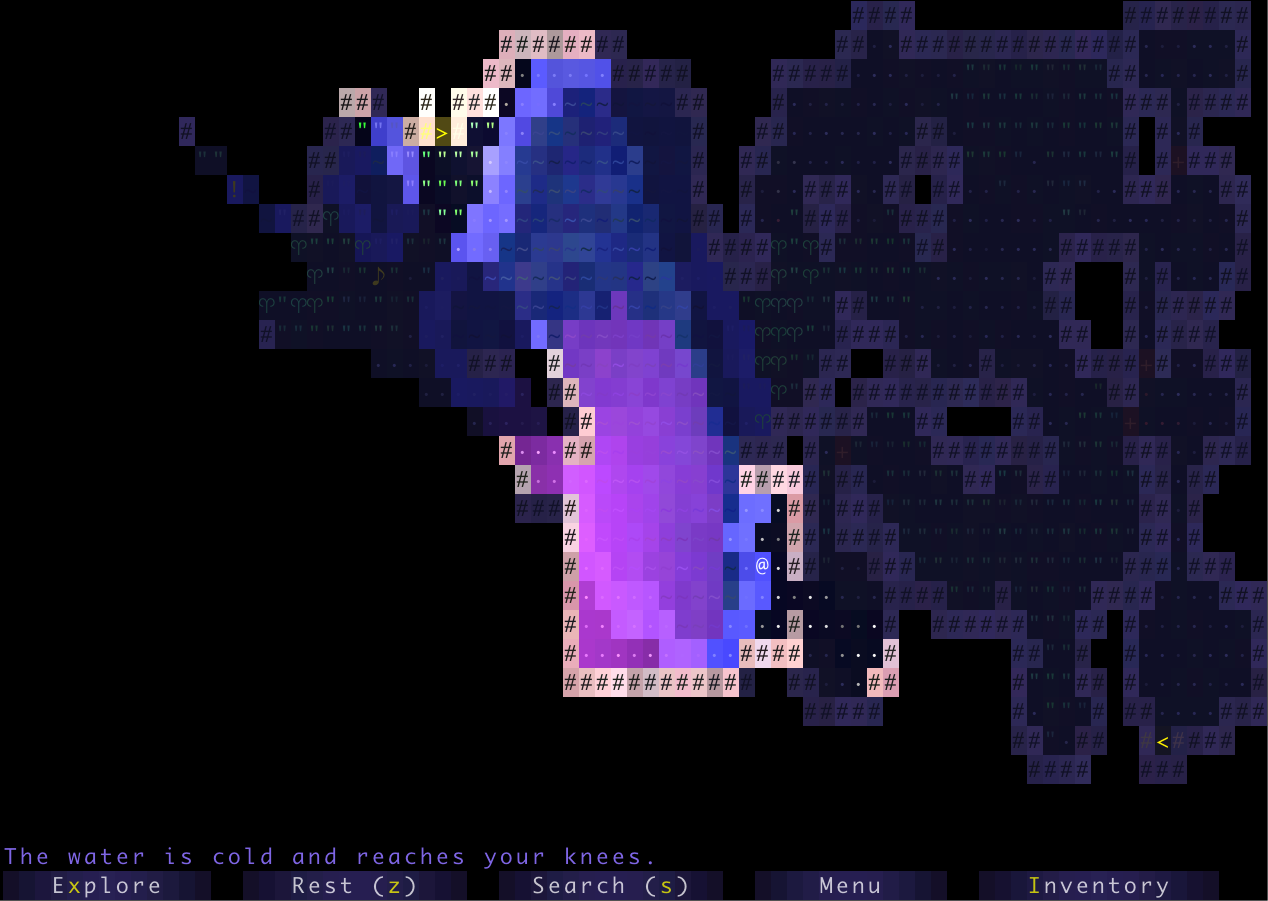
You may include additional features if you choose. In the example below (click image for higher resolution), as with the previous example, the mouse cursor is currently over a wall, so the HUD displays the text “wall” in the top right. However, this HUD also provides the user with 5 hearts representing the avatar’s “health”. Note that this world does not meet the requirements of the spec above, as it is a large erratic cavernous space, as opposed to rooms connected by hallways.
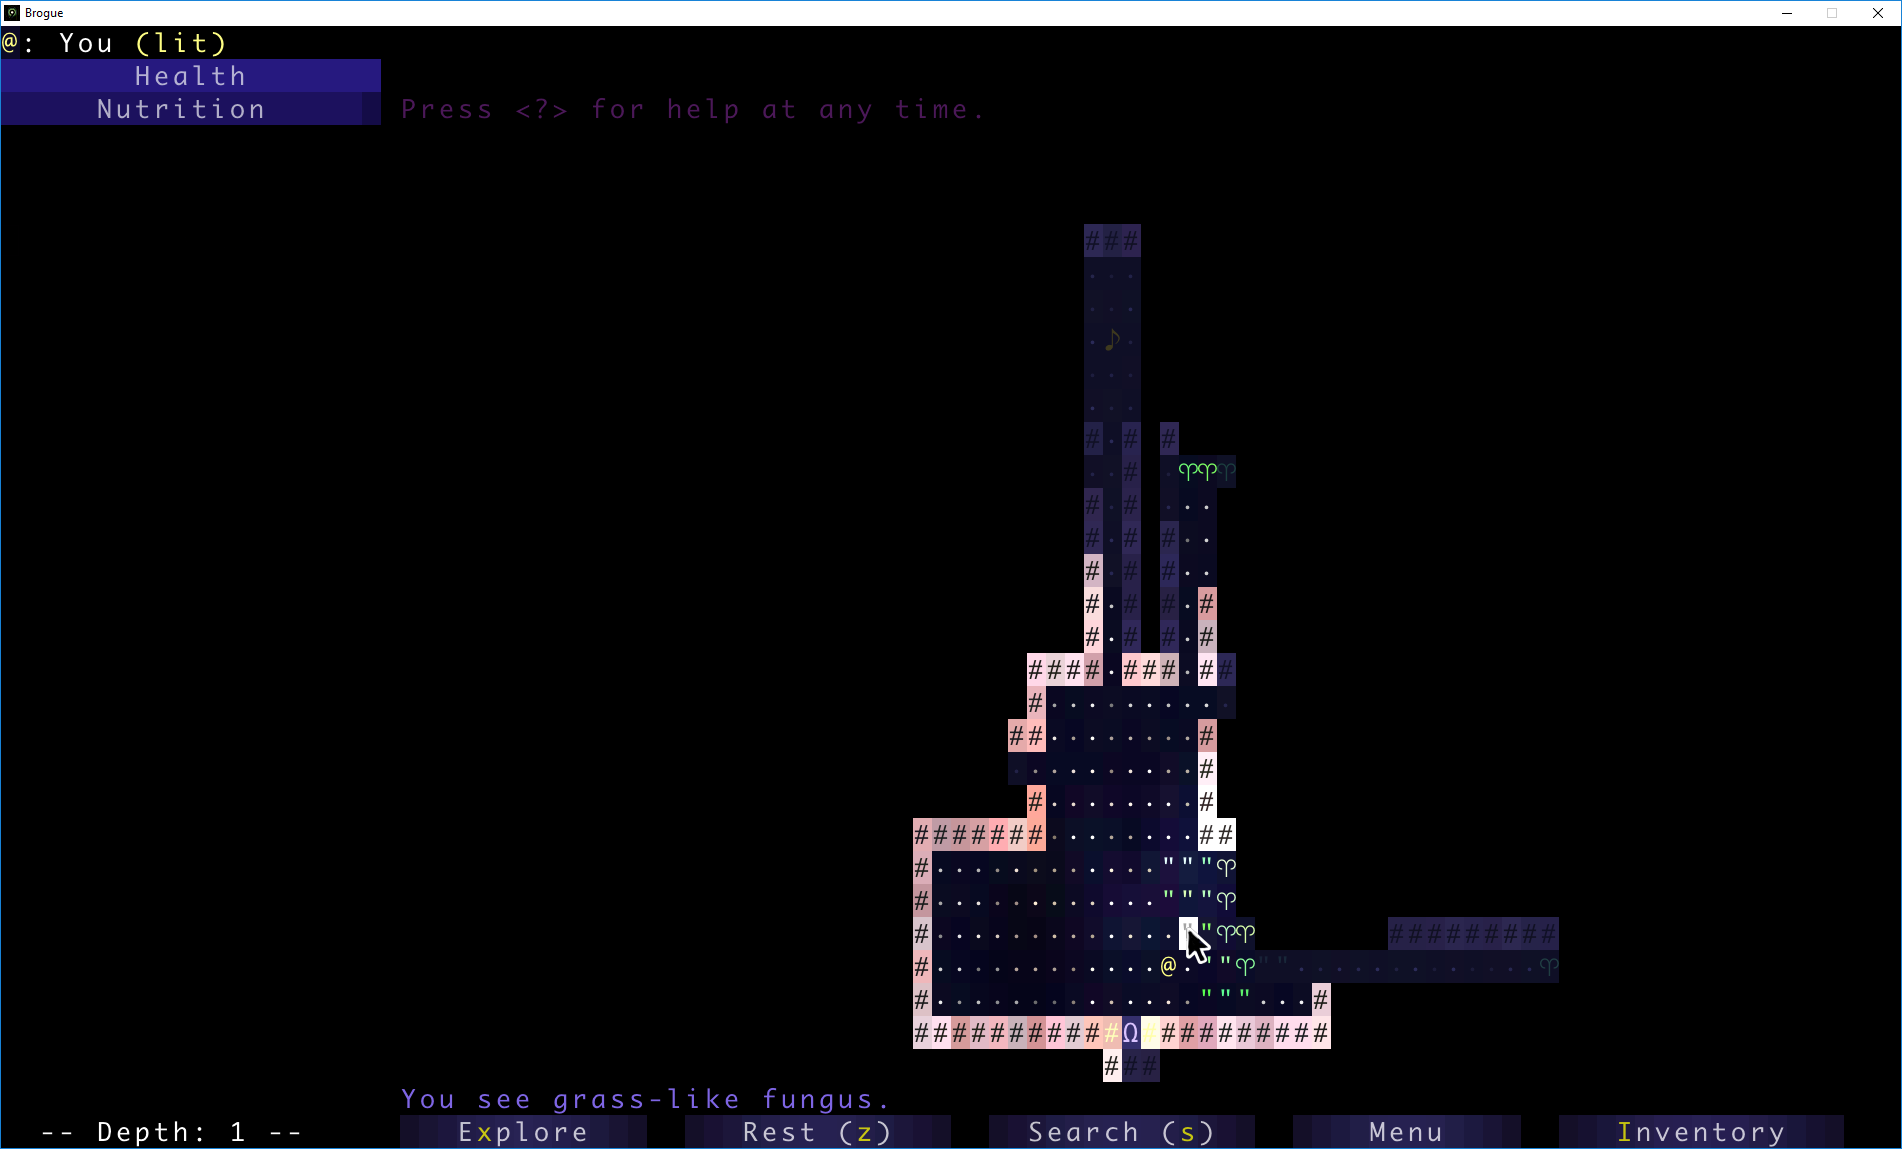
As an example, the game below (click image for higher resolution) uses the GUI to list additional valid key presses, and provides more verbose information when the user mouses-over a tile (“You see grass-like fungus.”). The image shown below is a professional game, so we do not expect your project to have this level of detail (but we encourage you to try for some interesting visuals).
For information about how to specify the location of the HUD, see the initialize(int width, int height, int xOffset, int yOffset) method of TERenderer or see lab 13.
UI Behavior
After the world has been generated, the user must be in control of some sort of avatar that is displayed in the world. The user must be able to move up, left, down, and right using the W, A, S, and D keys, respectively. These keys may also do additional things, e.g. pushing objects. You may include additional keys in your engine.
The system must behave pseudorandomly. That is, given a certain seed, the same set of key presses must yield the exact same results!
In addition to movement keys, if the user enters “:Q” (note the colon), the program should quit and save. The description of the saving (and loading) function is described in the next section. This command must immediately quit and save, and should require no further keypresses to complete, e.g. do not ask them if they are sure before quitting. We will call this single action of quitting and saving at the same time “quit/saving”.
This project uses StdDraw to handle user input. This results in a couple of important limitations:
StdDrawdoes not support key combinations. When we say “:Q”, we mean “:” followed by “Q”.- It can only register key presses that result in a char. This means any unicode character will be fine but keys such as the arrow keys and escape will not work.
- On some computers, it may not support holding down of keys without some significant modifications; i.e. you can’t hold down the e key and keep moving east. If you can figure out how to support holding down of keys in a way that is compatible with
interactWithInputString, you’re welcome to do so.
Because of the requirement that your system must handle String input (via interactWithInputString), your engine cannot make use of real time, i.e. your system cannot have any mechanic which depends on a certain amount of time passing in real life, since that would not be captured in an input string and would not lead to deterministic behavior when using that string vs. providing input with the keyboard. Keeping track of the number of turns that have elapsed is a perfectly reasonable mechanic, and might be an interesting thing to include in your world, e.g. maybe the world grows steadily darker in color with each step. You’re welcome to include other key presses like allowing the user to press space bar in order to wait one turn.
If you’re having trouble getting started on how to implement user interaction, check out InputDemo.java for inspiration.
Saving and Loading
Sometimes, you’ll be exploring your world, and you suddenly notice that it’s time to go to watch a CS 61B lecture. For times like these, being able to save your progress and load it later, is very handy. Your system must have the ability to save the state of the world while exploring, as well as to subsequently load the world into the exact state it was in when last saved.
Within a running Java program, we use variables to store and load values. Keep in mind that when your program ends, all the variables will go out of scope. Thus, you will need to persist the state of your program on some files that your program should create.
When the user restarts byow.Core.Main and presses L, the world should be in exactly the same state as it was before the project was terminated. This state includes the state of the random number generator! More on this in the next section. In the case that a user attempts to load but there is no previous save, your system should simply quit and the UI interface should close with no errors produced.
In the base requirements, the command “:Q” should save and completely terminate the program. This means an input string that contains “:Q” should not have any more characters after it and loading a world would require the program to be run again with an input string starting with “L”.
Interacting With Input Strings and Phase 2
Your Core.Engine.interactWithInputString(String s) must be able to handle input strings that include movement
For example, the string “N543SWWWWAA” corresponds to the user creating a world with the seed 543, then moving up four times, then left twice. If we called Core.Engine.interactWithInputString("N543SWWWWAA"), your system would return a TETile[][] representing the world EXACTLY as it would be if we’d used interactWithKeyboard and typed these keys in manually. Since the system must be deterministic given a seed and a string of inputs, this will allow users to replay exactly what happened for a given sequence of inputs. This will also be handy for testing out your code, as well as for our autograder.
Core.Engine.interactWithInputString(String s) must also be able to handle saving and loading in a replay string, e.g. “N25SDDWD:Q” would correspond to starting a new world with seed 25, then moving right, right, up, right, then quit/saving. The method would then return the 2D TETile[][] array at the time of save. If we then started the engine with the replay string “LDDDD”, we’d reload the world we just saved, move right four times, then return the 2D TETile[][] array after the fourth move.
Your world should not change in any way between saves, i.e. the same exact TETile[][] should be returned by the last call to interactWithInputString for all of the following scenarios:
interactWithInputString(N999SDDDWWWDDD)interactWithInputString(N999SDDD:Q), theninteractWithInputString(LWWWDDD)interactWithInputString(N999SDDD:Q), theninteractWithInputString(LWWW:Q), theninteractWithInputString(LDDD:Q)interactWithInputString(N999SDDD:Q), theninteractWithInputString(L:Q), theninteractWithInputString(L:Q)theninteractWithInputString(LWWWDDD)
we then called interactWithInputString with input “L:Q”, we’d expect the exact same world state to be saved and returned as TETile[][] as with the previous call where we provided “LDDDD”.
You do not need to worry about replay strings that contain multiple saves, i.e. “N5SDD:QD:QDD:Q” is not considered a valid replay string, since the program should have terminated before the second :Q. You do not need to worry about invalid replay strings, i.e. you can assume that every replay string provided by the autograder starts with either “N#S” or “L”, where # represents the user entered seed.
The return value of the interactWithInputString method should not depend on whether the input string ends with :Q or not. The only difference is whether the world state is saved or not as a side effect of the method.
Ambition Score
80 points of your project score will be based on features of your choosing, which we call your “ambition score”. The big idea is that beyond the base requirements of this project, we want you to try to polish your product a bit more and add some cool features. Below is a list of features worth either 60 points (primary feature) or 20 points (secondary feature). From these two categories, you are required to implement at least one primary feature in order to get full credit. This “ambition” category is only worth 80 points. If you do 100 points worth, you do not get extra credit. However, feel free to add as many features as you’d like if you have the time and inclination.
Your project must still meet the basic requirements described above! For example, if you allow the user to use mouse clicks, the project should still allow keyboard based movement!
60 Point Primary Features
- Create a system so that the tile renderer only displays tiles on the screen that are within the line of sight of the avatar
- Add the ability for light sources to affect how the world is rendered, with at least one light source that can be turned on and off somehow
- Add entities which chase the avatar/other entities by use of a search algorithm from class, with a toggle to display their projected path
- Create a system for “encounters”, where a new interface appears when the avatar interacts with entities in the world, returning the avatar to the original interface when the encounter ends (e.g. Pokémon)
- Add the ability for the user to “replay” their most recent save, visually displaying all of the actions taken since the last time a new world was created. This must result in the same final state as would occur if the user had loaded the most recent save.
- Add the ability for the user to change the perspective of their view (first-person, 2.5D, etc.)
20 Point Primary Features
- Add multiple save slots which also add a new menu option, and a new shortcut to save to slots other than slot 1. You should be careful to still support the default behavior of saving and loading in order to be consistent with the replay string requirements
- Add the ability to create a new world without closing and reopening the project, either as a special option you can press while exploring, or when you reach a “game over” state if you’ve turned your world into a game
- Add menu option to change avatar appearance
- Add a menu option to give your avatar a name which is displayed on the HUD.
- Add a menu option or randomly determine what the environment/theme of the world will be.
- Add a menu option to change all text in the interface to a different language. English should be the default and there should be a way to switch it back to English.
- Add support for mouse clicks on the main menu for anything that can be done with a keypress on the main menu
- Make your engine render images instead of unicode characters
- Add cool music to your menu and/or exploration interface. Also add sound effects for interactions the avatar makes with the world
- Add a minimap somewhere which shows the entire map and the current avatar location. This feature is a lot more interesting if you also implement a map which is larger than the screen so that you are unable to see the entire map normally.
- Add ability to rotate the world
- Add a display of real date and time in the Heads Up Display
- Add support for movement with mouse clicks on any visible square. You’ll need to implement some sort of algorithm for pathfinding
- Add support for 2 users to interact at the same time. This will require that you have two avatars on screen which can move around and have separate control schemes
- Add support for undoing a movement (even moves that occurred in a saved world before the current one was loaded). Undoing a movement should reset the world back to before the most recent keypress but should actually add to the replay string and not remove a character (ie. undo command should be logged in the replay string)
Requirements Summary
Here is a list of the requirements and restrictions on your project. Please note that this section does not substitute reading the entire spec since there are a lot of details which are not captured here.
- When using
interactWithKeyboard, your program must have a menu screen that has New World, Load, and Quit options, navigable by the keyboard. - When entering New World, the user should enter an integer seed followed by the S key. Upon pressing S, the world should be generated and displayed.
- Must have pseudorandomly generated worlds/variety in worlds, i.e. the world should be different for every seed.
- All generated worlds must include all the visual features described in phase 1 above.
- Users must be able to move around in the world using W, A, S, and D keys.
- Users must be able to press “:Q” to quit, and after starting the program up again, the L option on the main menu should load the world state exactly as it was before.
- All random events should be pseudorandom. That is, your program gives deterministic behavior given a seed.
- Users must be able to interact using
interactWithInputString, and behavior other than accepting input and drawing to the screen should be identical tointeractWithKeyboard. interactWithInputStringmust return aTETile[][]array of the world at the time after the last character in the string is processed.interactWithInputStringmust be able to handle saving and loading, just likeinteractWithKeyboard.- Your program must use our
TileEngineandStdDrawfor displaying graphics. - Your program must have a HUD, which displays relevant information somewhere outside of the area displaying the world/tiles.
- HUD must display a description of tile upon hovering over the tile.
- Your program must not use real time. Nothing should be moving if no input is being received.
- Your program must include features that make up 80 points from the Ambition categories.
Gold Points
For gold points, you should make it possible to win or lose in your world, effectively turning it into a game. Along the way, you should also introduce 3 “creative mechanics”. Mechanics refer to the underlying ways the game is controlled and how outcomes are calculated. The mechanics of a game make up the rulebook for the game and determine what can and cannot happen. Interesting games often have interesting mechanics and interactions that lead to a large variety of game states. For gold points, we are requiring at least 3 “creative mechanics”.
We leave it up to you to define creative mechanics. We aren’t going to police this closely, so creative mechanics will be on the honor system.
After adding your mechanics as well as your win/loss conditions, create a public youtube showcasing your game, including its creative mechanics and win/loss conditions, and submit a link using this form. Only one partner should submit the form. It is not necessary for you to able to actually win your own game. That is, it’s OK if your game is really hard.
Here are some ideas for potential “creative mechanics”. However, we require that at least 2 out of the required three mechanics are ones which you come up with yourself. This doesn’t mean you cannot include more than one of the following, just that only one from this list can count towards your total:
- Add some lore which is accessible from menu describing the background for your game and the story in your game
- Add flavor text for each tile which is also displayed next to the tile’s name when a mouse hovers over it. Flavor text is just a brief description which adds more of an explanation to each tile or makes a funny joke/reference
- Add some neat easter eggs or cheat codes to your game which do something fun. Maybe add the Konami Code
- Add entities which wander the world and destroy tiles
- Modify your game so that the world map consists of more than 1 screen. This is commonly done by either having stairs which lead to a different floor and a different layout, or by having a scrolling world map which moves as the avatar moves to the edge of the screen
- Add NPCs (Non-Player Charcters) which interact with the avatar. For example, adding 4 ghosts which chase the avatar and end the game if they are caught
- Add portals to your world which teleport the avatar.
- Add some kind of leaderboard or high score list to your game. Requires there to be an objective to your game and some notion of score. Should allow you to choose a name to be entered and should display at least the top ten scores with the associated names
- Add animations.
- Items which provide points or alter the abilities of the avatar when collected.
- Add an inventory to your game to store items which the avatar can use or equip.
- Add a health mechanic to your game to make it more interactive.
Grading
Autograder points: 400 points.
- Phase 1: 200 points.
- Phase 2: 200 points.
Partner Review points (will be available on Ed): 80 points.
- Phase 1: 40 points.
- Phase 2: 40 points.
Lab demo: 320 points.
- 80 points: Ambition points.
- 240 points: Obeying base spec for phase 1 and phase 2.
Gold points: 48 gold points.
Lab Demo Checkoff Script
In the hopes of keeping this process as transparent as possible, click here for the exact script the TA or tutor will use when checking your project. By the end of the demo, you should be able to determine exactly what points you received and will have an opportunity to demonstrate any feature which was not checked off during the demo but exists in your project. Note that while some of these features are a bit subjective, this demo is meant to give you a chance to defend your work and was chosen over having us grade it locked behind doors with no input from you. We will respect the amount of work you put into your project and you should have a discussion with us if you believe we are not grading you fairly.
Office Hours
Due to the open-ended nature of this project, it will be hard for the course staff to help you debug your project in the same way that they can for other projects. As a result, we will be implementing the following procedure regarding receiving help during office hours in order to be able to allot an adequate enough time for those that attend.
-
Course staff will spend at most ~10 minutes per student.
-
Your design document should reflect the current state of your program.
-
Your code must be well documented, including all methods you write, according to the style guide. This is to minimize time spent verbally explaining what each method does.
-
If your question is for debugging help, you must be prepared to explain the error that is being caused and have a test or input that can easily reproduce the bug for ease of debugging. If you come to us saying something does not work, but have not written any tests or attempted to use the debugger, we will not help you.
-
When we do provide debugging help, it may be at a high level, where we suggest ways to reorganize your code in order to make clarity and debugging easier. It is not a good use of your time or the TAs’ time to try to find bugs in something that is disorganized and brittle.
FAQ
Q: I want to make a world where we can explore the outdoors or caves or something like that, not a bunch of rooms. What should I do?
A: That’s fine, you can just use the seed to create a starter house (with rooms and hallways) for your avatar that they can freely exit.
Q: Can I make a world, that supports scrolling or multiple levels (i.e. stairs)?
A: Sure. In this case, interactWithInputString should return only the part of the world that is visible on the screen at the time that the last character in the replay string is entered.
Q: Can I add the ability for users to customize their character before creating a world?
A: Yes, but you’ll need to create a fourth main menu option. Your project must support exactly the API described in this spec. That is, “N23123S” must always create a new world with the seed 23123, and must not ask for any additional input from the user.
Q: I’m getting two standard draw windows instead of one. How do I avoid having two StdDraw windows?
A:Make sure you’re importing edu.princeton.cs.introcs.StdDraw instead of import edu.princeton.cs.algs4.StdDraw.
Q: Why is the phase 1 autograder saying “Could not initialize class edu.princeton.cs.introcs.StdDraw”?
A: Somewhere in your code, your interactWithInputString method tries to use the StdDraw class which is not allowed. For example if you call TERenderer.initialize(), you are using StdDraw. No StdDraw window should open when you call interactWithInputString. We’ve seen some students whose code only opens a StdDraw window for some seeds, so look very carefully.
Q: The autograder is getting a NumberFormatException caused by Integer.parseInt.
A: The Random class takes long as input, so the seeds we provide are too big to fit into an int. You need to use the Long class instead to parse the seed.
Q: The autograder is telling me my worlds are not distinct, even though I run the seeds locally, and the worlds appear visually different.
A: Check to see that every tile you use is represented by a distinct character. This is especially important if you create any new tiles.